
23 Comments
Scrappy Tails A7 Flower Cover Plate- 3 Ways
Welcome to the Scrappy Tails Craft’s Flower Shop blog and video inspiration hop! Today, we are hopping along to celebrate the launch of our new Spring collection! Each designer along the hop will be showcasing products from the new release to hopefully give you some ideas and inspiration for your Spring and Easter cards.
As you hop along, be sure to leave your comments on each person’s blog and video to enter into the chance to win one of two $25 gift certificates to the Scrappy Tails Craft’s website! The more comments you leave, the more opportunities to win! If you enjoy the hop and all of the beautiful projects showcased, consider subscribing to each designer featured on the hop! Also, please consider subscribing to the Scrappy Tails Craft’s Youtube channel for more inspirational video tutorials and to never miss out on future giveaways.
The hop ends on Friday, April 15th at 11:59 PM EST. Winners will be announced on the Scrappy Tails Craft’s Youtube channel and blog on Saturday, April 16th.

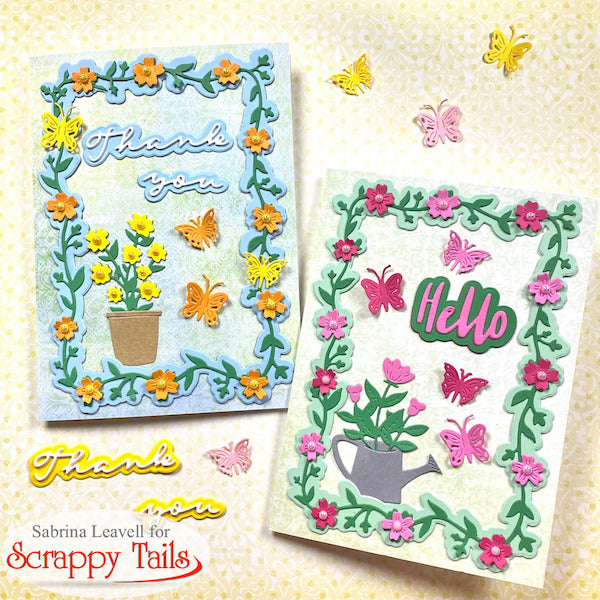
The die set includes two dies to create a shadow behind the main flower frame. I decided to use it for my cards today, I love how it just makes the frame pop against whatever background you use. My first card features the cover plate shadow cut from light green card stock.
I cut the cover plate from dark green card stock and paper pieced the pink flowers on top. The die includes the flowers separate so you can easily die cut and glue them on top of the frame. As a finishing touch, I added pink pearls to the centers of each flower.
Once my flower frame was glued together, I added it onto a 5x7 panel that I cut from green pattern paper.

Sometimes cover plates can make it tricky to decorate the rest of the card. Part of the reason I love them so much is because they're great just by themselves. However, by adding a few additional die cuts, you can really bring these plates to life on a card!
I added a paper pieced watering can filled with flowers to the bottom left corner of the card. These images are from the new "Potted Flowers" die set. Surrounding the watering can, I added some pink butterflies from the same "Potted Flowers" die set and the "Garden Flowers" die set. I opted to cut them from the same pink I used to cut the flowers in. It kept the card cohesive. I still wanted the cover plate to shine.
The "Hello" sentiment was die cut from the "Slimline Pop up Shadow Box" die set. I cut the shadow from dark green card stock and the word itself from pink. Whenever I use a die cut sentiment, I always like to add extra white layers underneath to help it pop!

My second card features the "A7 Flower Cover Plate" cut from green card stock. I knew my flowers were going to be orange, so I chose to die cut the shadow layer from light blue card stock, since blue is orange's complimentary color. As a finishing touch, I added orange pearls to the centers of each flower.
Once my flower frame was glued together, I added it onto a 5x7 panel that I cut from blue and green pattern paper.

I die cut and paper pieced another flower pot from the new "Potted Flowers" and "Garden Flowers" die set. I added yellow pearls to the centers of each flower.
Again, I added some orange butterflies around my pot.
This time, I used the sentiment included in the "A7 Flower Cover Plate" die set. It includes the words "Thank you Friend" and the shadow dies. I cut the word "Thank you" three times from white card stock and stacked them together. I cut the shadows from the same light blue card stock.
Bonus Card

Since I had all the supplies out, I figured I'd make one more card in a traditional white, black and silver color scheme. This could make a beautiful wedding card!
This time, I die cut the cover plate from silver mirror card stock, and the shadow from black. I opted for white flowers with pearls on this card.
Once my flower frame was glued together, I added it onto a white embossed 5x7 panel.

I decorated the center very simply with just the "Thank you Friend" sentiment and some more silver flowers. I think this is a great one to mass produce!
Thank you for hopping along with us today! If you see something that catches your eye as you're hopping along, be sure to use our design team member’s affiliate links listed in their blogs and video descriptions! This is no added cost to you, it’s just a fun way to support our crafty friends!
Thanks for stopping by!
The next person on the hop is the Scrappy Tails Youtube Channel!
23 Comments
Love this card especially the trim around the card
Your cards are so bright and beautiful!
This release if just amazing !! I’ve had so much fun playing with it.
Hugs, Joy