
2 Comments
10 Spooky Halloween Cards Using 1 Card Kit
Happy Hauntings to you all! Today, I'm creating 10 spooky Halloween cards using the new Scrappy Tails "Happy Hauntings" card kit.
Kit Break Down

Our "Happy Hauntings" Card Kit is a $60 retail value for only $39.95!
- Scrappy Tails "Happy Hauntings" 6x6 pattern paper pad ($7.95)
- Scrappy Tails "Witch's Brew" 6x6 stamp set ($21.95)
- Scrappy Tails "Halloween Animals" die set ($14.95)
- Scrappy Tails "Spooky Web" stencil ($6.95)
- Scrappy Tails "Witch's Brew" rhinestone mix ($3.75)
- Scrappy Tails "Happy Hauntings" sequin mix ($3.75)
I always try limit my supplies as much as possible when it comes to using card kits. However, I did decide to use the coordinating dies for the "Witch's Brew" stamp set to save time and fussy cutting stress LOL.
Video Tutorial
Enter to win one of these card kits by leaving a comment in my comment section of my process video. Let me know what your favorite card is. I will announce the winner on September 3rd!
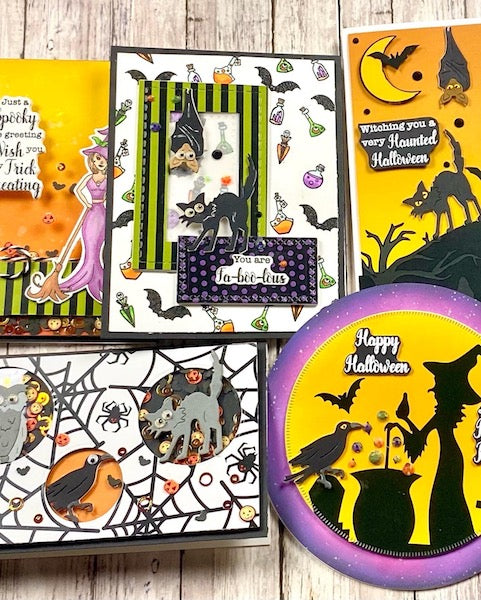
Card One

I started my first card by stamping a fun background using the potion bottles and bat image from the "Witch's Brew" 6x6 stamp set. I colored them in with my Copic markers.
Using papers from the "Happy Hauntings" paper pad, I die cut a striped frame using two nested rectangle dies. I also die cut a solid rectangle from the polka dot paper.

I preassembled all of my Halloween animals before starting my 10 cards. I made a few with the eyes included in the die set and some with google eyes. I opted to use the google eyed cat and bat for this card.
On the polka dot rectangle, I adhered my sentiment. The "Witch's Brew" coordinating dies include coordinating dies for all of the sentiments.
Finally, I scattered a few of the rhinestones included in the kit around the card.
Cards Two & Three

The "Happy Hauntings" paper pad includes three pre made designs. Meaning, they're already drawn out scenes, ready for a card base. I decided to change it up and use two of the papers to create some shaped circle cards.

My first circle card features the bats flying over the moon. I die cut the moon using a circle die. Then, I cut a 5.25x5.25 card base using my largest circle die. I over hung the top of the circle above the scoreline so it didn't cut through my card base, but instead created the shaped circle base that can still open and close.
Using that same circle I used to cut my base, I die cut a solid white piece for my ink blending. I also used it and a slightly smaller circle to create a black frame to go around my card.

I ink blended Hickory Smoke and Black Soot Distress Oxide inks around the edges of my white circle. Once dry, I splattered some Gansai Tambi pearlescent watercolor. This created the look of stars!
I popped up my moon with two additional heavy weight circles that I glued behind. Then, I added two white heat embossed sentiments, and embellished the card with the black rhinestones and the bat sequins that come in both embellishment mixes.

My second circle card features the witch and her cauldron in front of the moon. I die cut the moon using a circle die. Then, I created my card base the exact same way I did for the bat card.
Using that same circle I used to cut my base, I die cut a solid white piece for my ink blending.

I ink blended Seedless Preserves, Chipped Sapphire and Black Soot Distress Oxide inks around the edges of my white circle. Once dry, again, I splattered some Gansai Tambi pearlescent watercolor to add some stars in the background.
I popped up my moon with two additional heavy weight circles that I glued behind. Then, I added two white heat embossed sentiments, and a crow. Finally, I embellished the cauldron bubbles using the rhinestone mix from the kit.
Card Four

I thought it would be fun to showcase the sequin mix with a flat shaker card. If you haven't tried these yet, you have to, they're so fun!
The background was created with Distress Oxide Inks in colors: Abandoned Coral, Carved Pumpkin and Mustard Seed

On top of my shaker, I added a strip of pattern paper to the bottom along with a twine bow. I added one of the fa-boo-lous witches from the "Witch's Brew" stamp and a sentiment.
Card Five

Card five is one of my favorites, because I love that jack-o-lantern patterned paper!
I started by creating my background panel using two patterns from the paper pad. Then, I die cut three stitched ovals from the purple star patterned paper, and matted each one with a black oval behind.

On each oval, I added an owl, wolf, crown and sentiment. I thought they ended up looking like spooky picture frames!
I arranged the ovals on my card panel and embellished with rhinestones. I matted the panel with orange card stock, I think this brightened up the card nicely!
Card Six & Seven

I created two mini slimline cards using the last premade paper from the kit! I cut the paper directly in half to create two card panels. From another sheet, I fussy cut the haunted castle, the graveyard, the hill, the bats and the moon. I popped those up using foam tape on both of my cards for added interest.

After popping up my elements, I added a wolf to the bottom of the graveyard and a sentiment to the top left of the card panel. Finally, I embellished the sky with a few black gems from the rhinestone mix.

After popping up my elements, I added a black cat to the top of the hill and a bat hanging from the top of the card panel. Beside my bat I popped up my sentiment with foam tape. Finally, I embellished the sky with a few black gems from the rhinestone mix.
I love that both of these cards match. They're very simple designs, but they're my favorite out of the 10!
Card Eight

The small accessory images from the "Witch's Brew" stamp set are perfect to create a Witches cabinet scene. I arranged all of my stamped images onto the shelves. Every witch needs her trustee broom, hat and cat right? I had to add them leaning against the right side of the scene.

I mounted my witch's cabinet panel onto the spider web patterned paper from the kit. By the way, that spider web is the same spider web that's on the stencil included in the kit! I actually didn't use the stencil for my 10 cards today, so that's just another added bonus to have included in the card kit!
Since this card didn't have room for a sentiment, I added one to the inside of the card.
Card Nine

I had to use those sequins again, so I decided to create a slimline card with 5 die cut circle windows. I added acetate behind all of them and a single layer of foam tape. behind two of the circles, I added orange card stock. Behind the other three, I added my sequins and black card stock.
On top of each circle, I adhered a Halloween animal. I trimmed them in a way to make them look like they're peaking from behind the circle windows.
To finish off my card, I popped up a sentiment and embellished with more of the sequins.
Card Ten

Card ten features the other fa-boo-lous witch included in the "Witch's Brew" stamp set. I glued her onto a patterned paper card panel I created with a circle die from my stash. To break up the two patterns, I added a black circle frame. Next to her cauldron, I added a potion bottle and a skull.

I embellished the cauldron bubbles using the rhinestones from the kit. This card was finished off with a popped up sentiment and a scattering of more rhinestones.
That finishes off my 10 cards today, I hope you all enjoyed them!
-Sabrina
2 Comments
I loved all of your cards on your YouTube channel.. I was just curious as who the three winners are? I can’t seem to find them..
Thanks for starting off the blog hop! Heading on to next to see what needs to be added to the order. 😜