
2 Comments
A2 Pop up Shadow Box Books
Hello everyone! I don't normally do a coordinating blog with my videos anymore, but these cards turned out so amazing. I wanted to share some more info about them and also show you the the amazing close up pictures I took!
Everything I used to create these pop up shadow box book cards are Scrappy Tails products listed and linked below.
Video Tutorial
How to Create a Pop up Shadow Box Book Card

From the pop up shadow box book die, cut the largest die twice from light weight cardstock (I prefer lighter weight as the book will be quite heavy after adding the shadow box element inside.) Leave the size as is if you're creating an A7 sized book. To create other sizes cut both panels to:
- A2: 5.25 x 5.5" (This includes a half inch rounded book spine)
- Mini Slimline: 4.5 x 6" (This includes a half inch rounded book spine)
- 4.75" Square: 5.75 x 4.75 (This includes a half inch rounded book spine you don't have to cut the width, it's already 5.75")
Cut every panel on the right side, do not cut off the two scorelines on the left, those scorelines will create the spine of the book
Glue both panels together by adding adhesive to one of the panels. Add adhesive to the area left of the second scoreline. Attach the second panel on top.
(see video tutorial)
The Pages of the Book

From the pop up shadow box book die, cut the accordion die four times from light weight cardstock.
- Cut the accordion pieces down to create the follow sized book cards:
- A7: leave two pieces uncut, cut the other two accordions down to 4.75"
- A2: Cut two accordions to 5.5" cut the other two to 4.25"
- Mini Slimline: Cut two accordions to 6" cut the other two to 3.5"
- 4.75" Square: Cut all four accordions to "4.75"
For a less snug fit, you can trim each size down by 1/8 of an inch. This will make it easier to glue inside your book.

To create the shadow box, take all of your accordion pieces and intertwine each mountain and valley to the connecting pieces all the way around. Glue the front and back of each of the four corners of the frame to secure everything in place. Once your frame is connected, adhere it to the inside of your book cover.
(see video tutorial)
Galaxy Backgrounds

Ink blend the following colors onto 8 card panels cut to the following measurements:
Panel One (4.25x5.5") (X2)
Panel Two (4x5.25") (X4)
Panel Three (3.75x5") (X2)
Ink blend Chipped Sapphire, Salty Ocean, Picked Raspberry and Twisted citron randomly across all 4 panels, it doesn't have to be perfect. In fact, mine looked quite messy!

Once all of your colors are added, go over some areas of the panel with black soot. I know this is scary but it's necessary to create that nebula galaxy look!

Splatter some pearlescent watercolor with a paintbrush to create the look of stars. For brighter stars, you can splatter white acrylic paint or gouache.
Card One

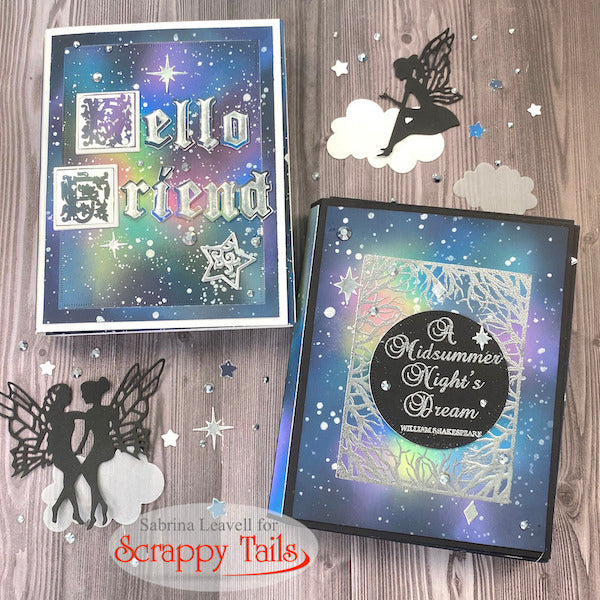
The front cover of this book was created first by silver heat embossing our incentive "Midsummer Night's Dream" 3x4 stamp onto one of the galaxy backgrounds. The text didn't stand out enough for me, so I silver heat embossed it again on a black circle.
After adhering my circle, I scattered a few silver rhinestones and stars around my panel for added shine.

I adhered one galaxy background to the left page of the book. From one of my larger galaxy backgrounds (4.25x5.5") I die cut a stitched rectangle from the center. This will leave me with a smaller rectangle and a 0.5" frame.
I glued my black die cut forest A2 coverplate on top of the frame. I glued the smaller galaxy rectangle to the very back of my shadow box. Behind the frame, I added acetate to create a "glass box" look.

Inside the shadow box, I added our crescent moon incentive die, some vellum trees (cut from the same coverplate), and a few silver stars. Everything is glued on different levels of the book to create the look of depth.
Onto the branch of my black forest coverplate, I glued a fairy that I die cut from silver mirror cardstock.
Card Two

Lately, I've been obsessed with hot foiling, so I hot foiled some Old English Font letters to spell out the words "Hello Friend" The upper case letters have a fun "Shrek" style to them. The lower case letters come with coordinating dies to cut them out and help with alignment!
This panel was further decorated with silver rhinestones and stars.

 The inside of this book is simply magical, especially with the light up element! First off- I silver foiled our "Fairy Dust Swirl" hot foil plate onto two galaxy backgrounds. I adhered one to the left page and one to the right. (I did the same frame trick from the last card) I also added acetate behind my cloud frame.
Behind the galaxy frame, I added our A2 cloud coverplate, which I cut from white cardstock. Behind the white, I added the same coverplate, just slightly offset from vellum. I love how the vellum adds a subtle interest!


Okay so, you obviously don't need to add lights from Pear Blossom Press inside the book, but I thought they would take this pop up to a whole other level! To see how I wired the lights and hid the battery, watch the video above!
To finish the inside off, I added a single fairy silhouette to the left page. She's sitting on a vellum cloud. I tucked a few more vellum and white clouds inside my shadow box. On a large vellum cloud, I adhered my fairy friends silhouette, super cute! I tried my best to not go overboard with the clouds as obviously you want to see those cool light up stars!
The "PUSH HERE" sentiment comes from a Lawn Fawn "Push Here" 3x4 stamp set. I stamped the push here button with Chipped Sapphire ink and added it to a die cut cloud. (All of the clouds are included in that A2 Cloud Coverplate die!)

Thank you so much for taking the time to read my rather long blog post. I figured this would be a helpful guide for people creating their own pop up shadow box book cards! I'll see you next time!
For more inspiration please join us on the Scrappy Tails Crafts Facebook page! Additionally, you will find stunning projects on the Scrappy Tails blog, Youtube, and on Instagram!
2 Comments
I just discovered Scrappy Tails in Novi, Novi MI 5-9-25. I am so excited to start creating using the book set! I really really want the crescent moon and the stamp set A Midsummer Night’s Dream. How can I get this!? I have created an account on your site and I have added many wish list items! I love the pop up book. So happy that I got the last one at the show today!!
I love the detailed instructions you made for us…I can see me making the mini slimline… Can’t wait to get started…Thanks for everything Sabrina!!! 🥰🥰🥰🥰