
0 Comments
A7 Spinning Pop up Snow Globe Tutorial + More Samples!
Video Tutorial
Product Showcase Winners!
Congratulations @stmpgrl and @AnnHolliday you both each won a $50 gift card to Scrappy Tails Crafts! Please email me at info@scrappytailscrafts.com to claim your prize. Thank you everyone who left some comments and likes over on my product showcase video it means so much!
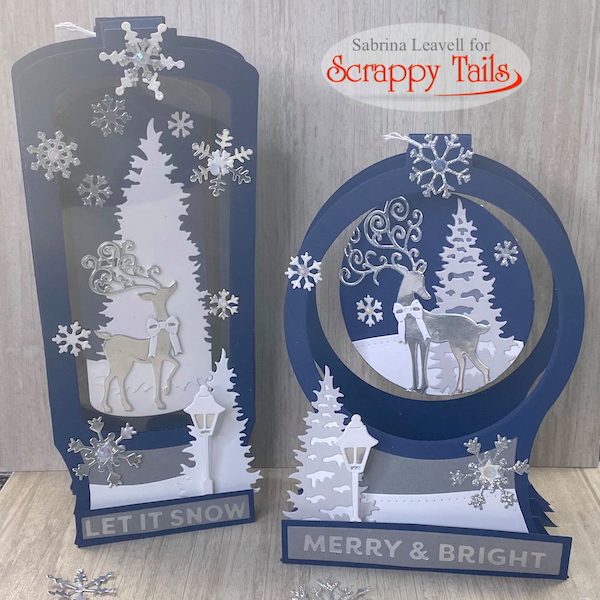
Card One

If you're looking for a classic and elegant color scheme for winter cards, silver, white, grey and navy is a great choice. For this card, I die cut all of my snow globe base pieces from navy card stock. If you want to see how to construct these cards, check out my video tutorial HERE.

The spinner features our new "Elegant Reindeer" die and a small tree from our new "Snowy Winter Trees" die set. Watch my video above to learn how to attach your spinners inside your snow globes.
The trapeze was cut from dark grey card stock. I added a stitched hillside to the bottom of it to create a snowy scene with another Winter tree and a lamp post.
I left the 1" flap on the large snow globe accordion to attach my hot foiled sentiment. You can cut this flap off if you want to see more of the trapeze instead.
 To finish off the card, I added a little die cut bow to my reindeers neck.
Then, I adhered some larger snowflakes to the card base, and some smaller snowflakes to the front and back of the spinner. The snowflakes I used come from the "Snowflake Spinner" die set and the "Winter Essentials" die set. In the center of all of my snowflakes, I added some clear iridescent gems.
Card Two

If you love your color scheme and the stamps/dies you're using, why not create a second card in a different size? This design is very similar to card one, I wanted them to match (I love matching cards!) Again, I cut all of my base pieces from navy blue card stock including my spinner.
Unlike the previous slimline snow globe cards I showed you, I made this one into a swinging shadow box design. As you can see, this card has a full backer to it. This ensures that my "spinner" swings as opposed to fully spins.

To create the shadow box, I glued a second framed base piece into the center of my bottom accordion. There's a total of three base layers (two frames, and one solid panel in the back). I die cut four side accordion pieces. I glued two on each side of the snow globe connecting the front frame to the middle frame and the middle frame to the back panel. Be sure to watch my video tutorial to see how this is done.
Once your side pieces are fully adhered, glue your top accordion pieces. Glue one connecting the front and middle frames together and one connecting the middle frame and the back panel together.
PRO TIP: Before gluing your top and side accordions, be sure to add your acetate behind the front frame if you want to create that "faux glass" shadow box effect. Now is also the time to add your shaker element behind your front frame.

The spinner is swinging from the back top accordion. It's up to you if you want it further back or more forward. I would suggest stringing it to the back accordion if you want to add a shaker or an acetate in front.
The spinner features a reindeer from the "Winter Essentials" die set and a solid white tree from the "Snowy Winter Trees" die set. The front of the card was decorated the exact same way as the A7 design, with a tree, snow hill and a lamp post. On the front flap, I added another hot foiled sentiment.
Finally, embellish your snow globe with some snowflakes and iridescent gems!
Because of the extra layers, this card is super thick. It'll still fold flat, but you'll definitely want to mail it in a bubble mailer. Alternatively, this can be gifted as a home decor piece!
Card Three

Today, I'm really feeling the color blue, can you tell?! Every year, I like to create half Winter themed cards and half Christmas themed cards. That way, I have some Holiday cards and some more Wintery themed occasional cards.

You may be thinking, this card look familiar... well, that's because it is. In part two, I shared the gold and white version of this card. I loved it so much, I decided to create the blue white and silver version.
As you can see, this is the same color combo as the first two cards I shared. However, this one looks a bit different because I made white the primary color as opposed to navy blue, cool right?

The spinner on this card was created with the dies included in the "Snowflake Spinner" die set. I love this set because you can create this large gorgeous snowflake. I think it would also look fabulous as a focal point on an A2 card. The set also includes some smaller snowflakes that I love to sprinkle on almost all of my card designs! I would say that this one definitely gives you a lot of bang for your buck!
To embellish the snowflake, I used some blue and white rhinestones from my stash. One side of my snowflake is blue glitter with white on top and the other side is white with blue glitter on top. This creates a really cool effect when the snowflake spins!

Just when you thought, I can't possibly create anything else with these snow globe pop up dies, WRONG. Haha, you can actually remove the spinner piece if you want. Depending on how big your knot is on your string/twine, you may be able to actually pull the center piece out of the card completely. This is really cool if you want your recipient to use them as ornaments or Holiday tags!

Here's a look at the other side of the snowflake. I love the reverse two toned look. The bottom of the card was decorated with some smaller snowflakes , a white trapeze and a silver hot foiled sentiment. As a finishing touch, I added gems to the centers of all of my small snowflakes.
By the way, most of the back of my cards are decorated very simply. Normally, I will add another trapeze and a few extra snowflakes. You don't have to decorate the back, I just love when everything looks cohesive and finished!
Card Four

Let's change gears and look at a traditional Christmas shadow box book card, shall we? This is an A7 book. The front cover features some new dies from the "Holiday Essentials" die set. The beautiful ovals are from the "Intricate layering Ovals" die set.
I forgot to add some gold pearls to the centers of the poinsettias and the tittle for my "i" in "wishes", but I did do that off camera!

Inside the card, we have a beautiful Christmas tree scene. I let the pattern papers shine by not going to crazy with my die cut images.

I kept the left side super simple with just a layered bell die cut.

The shadow box features a gorgeous layered Christmas tree inside. I used the dies that come in the "Christmas Tree Spinner" die set to create my tree and presents. You can make the tree more detailed by inlaying the ornaments and ribbon, but I decided to keep it simple by just adding a gold solid layer behind my green detailed tree. One thing I forgot to do was cover the green star with a gold one!! Be sure to do that LOL.
The curtain was created using dies from the new "A7 Theatre Cover Plate" die set. I love this set because you can create a theatre stage with it or a window scene such as this one.
Card Five

My final card today is another slimline shadow box. This design has three snow globe frame panels and one solid panel in the back. By adding three frames, I was able to create an awesome "tunnel" effect with my Winter village scene.

When I found this gorgeous light purple pattern paper in my stash, I knew I had to use it as my card base. Behind each pattern paper panel, I did add a heavy weight white panel for more stability.
Because this is a four layer shadow box, I ended up needing three top accordions and 6 side accordions (3 on each side). I cut all of them from the same pattern paper so that everything coordinates. To create this exact card, you'll need at least one full 12x12 pattern paper. I used two, because I decided to add the pattern paper to the inside frame layers too (optional).

I used the new "Winter Village Spinner" die set to create the layered scene inside my card. I cut the village from white card stock twice and layered gold behind each building. You can layer different colored houses on top if you want.

As mentioned, I cut the village die twice. I left one die cut completely in tact. The other one I cut apart into two pieces. One piece being the top row of houses, the second piece being the two bottom rows of houses. I glued the single row of houses to a stitched snow hill and glued that behind my first snow globe frame. I glued the two bottom rows of houses behind the second frame and the full village panel behind the third frame. On the back wall, I glued the snowfall piece that's included in the same Winter Village die set.
I know this one seem complicated, I'll be honest, it kind of is. Let me know if you'd like to see a video tutorial on this design!

Finally, I embellished this card with some gold glitter snowflakes, pearls and a gold hot foiled sentiment. I think out of all 20 snow globe cards I created, this one is my favorite. I absolutely love the colors, composition and weight of this card!
That's all for today folks, thank you so much for stopping by to read my very long blog post! I will have part four (my final blog) posted in the next few days!
-Sabrina