
0 Comments
Galaxy Fairy With Transparent Wings
Coloring transparent wings or other objects can seem scary and almost self defeating resulting in never trying. I am using the Fairy Girl 4x4 stamp set from Scrappy Tails Crafts to demonstrate the technique and to hopefully take away the fear for you.
In addition to coloring fabulous wings, I demonstrate how to create a galaxy background using Color Burst watercolor powders. This is a fun one, so I hope that you will stick around for the details!
Video Tutorial
If you'd like to see the entire process, please feel free to watch my video above!
Card Details

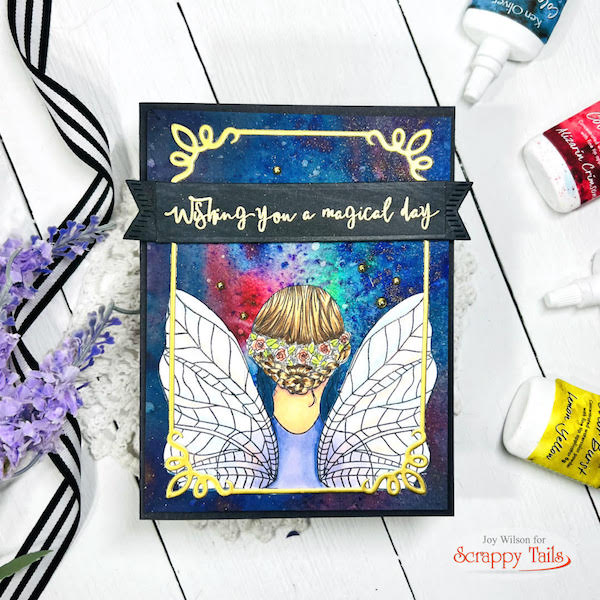
I stamped the fairy girl image with Memento black ink, a Copic Friendly ink. I used simple color blends for the skin, hair and clothing. I used some bolder Blue Violet colors for the shirt. On the wings, I used lighter BV markers where the shirt peaks through. By using a much less saturated marker, I gave the illusion of the wing being transparent.
Copic coloring:
Shirt: B4 04, 02, 01Wings: BV 00, 01 BG11, B00, R01|
Hair: E 51, 53, 55, 57, 59
Skin: E 000, 00, 04, 11, 21
Headband, R11, 14, YG 03, 13
I left the remaining parts of the wings white, but added colors from the background so that they too would peak through. For instance I used BG 11 and B 00 to add the hints of blue, but then added R 01 at the points closest to the red area on the background. It's important to notice that I placed pops of blues and reds in 3 different places along the wing to simulate light bouncing and reflecting. Once I was happy with the color placement, I added sparkle using a shimmer pen. Pretty easy right?

Creating the background was a blast too! I used watercolor paper and tapped Color Burst pigment powders onto the panel and saturated it with water. I repeated the step one more time, making sure to dry the panel between the applications.
Once the panel was dry, I blended Distress Oxide inks in the colors Chipped Sapphire and Black soot along the outer edge and strategically throughout the panel allowing some of the water colors to shine through creating a galaxy effect.
To add even more interest, I spritzed the panel with a gold mica spray that I made. You can also spritz white spray to create stars.
Once the background was completely dry, I adhered my watercolor panel with fun foam to the card base. I added a thin die cut frame from the A7 Book Pop Up die using gold mirror card stock. Finally, I heat embossed a sentiment from the "Fairy Girl" stamp set in gold and adhered it allowing it to hang off the edge.
For more inspiration, please join us on the Scrappy Tails Crafts Facebook page! You will find stunning projects on the Scrappy Tails blog, Youtube, and on Instagram!
Follow Joy on Social Media!
Instagram
Blog
Youtube