
1 Comments
Hero Arts October 2019 | 5 cards 1 kit
Hi everyone! Today's blog post showcases 5 cards that I created using the My Monthly Hero Arts October 2019 card kit. The stamp set included many whimsical 50s inspired Christmas images that were incredibly fun to color. I had a "jolly good time" looking up tacky 50s furniture and color schemes to implement onto my card designs. I was definitely inspired by this kit to say the least. In fact, I was so inspired that I'm quite sad that I wasn't able to find the time to make another 5 cards. But that's okay, 5 are better than none right? I love that any of these cards can be given to my grandparents who grew up in the era. I'm sure they would bring a smile to their faces! I colored all of the stamped images with my copic markers. All of my cards are A2 sized and I created my own card bases using 110 lb white card-stock. If you have any questions feel free to leave me a comment and I will be sure to respond to you as soon as I can. Thanks for stopping by!
Here's a look at all 5 cards! Which one is your favorite?


Card One:


WOW, the glitter that came in the kit is amazing right? I might have went overboard with the glitter, but it is a holiday card after all. I created this adorable tree farm scene using various images from the stamp set. I made the background trees by silver heat embossing several of them onto some different shades of green and white card-stock. I hand cut a few snow banks to tuck my trees under. The trees in the back of the scene I made smaller by cutting the tree's wider portions off so I'm just left with the small tips of them. (See video) The closer the trees come to the car, the taller they are. The sky was created using the turquoise card-stock that came in the kit and some distress inks in broken china, faded jeans and black soot. I added some snow using a white gel pen. The road was also hand cut. (See video) To really make this card whimsical, and to have it tell a story, I popped up a bright red Chevy car driving on the road with a tree attached to its roof. Oh no, It looks like a few Christmas packages might have fallen out of the trunk! The scene is complete with a small die cut sign that reads "Trees for SALE"
Card Two:


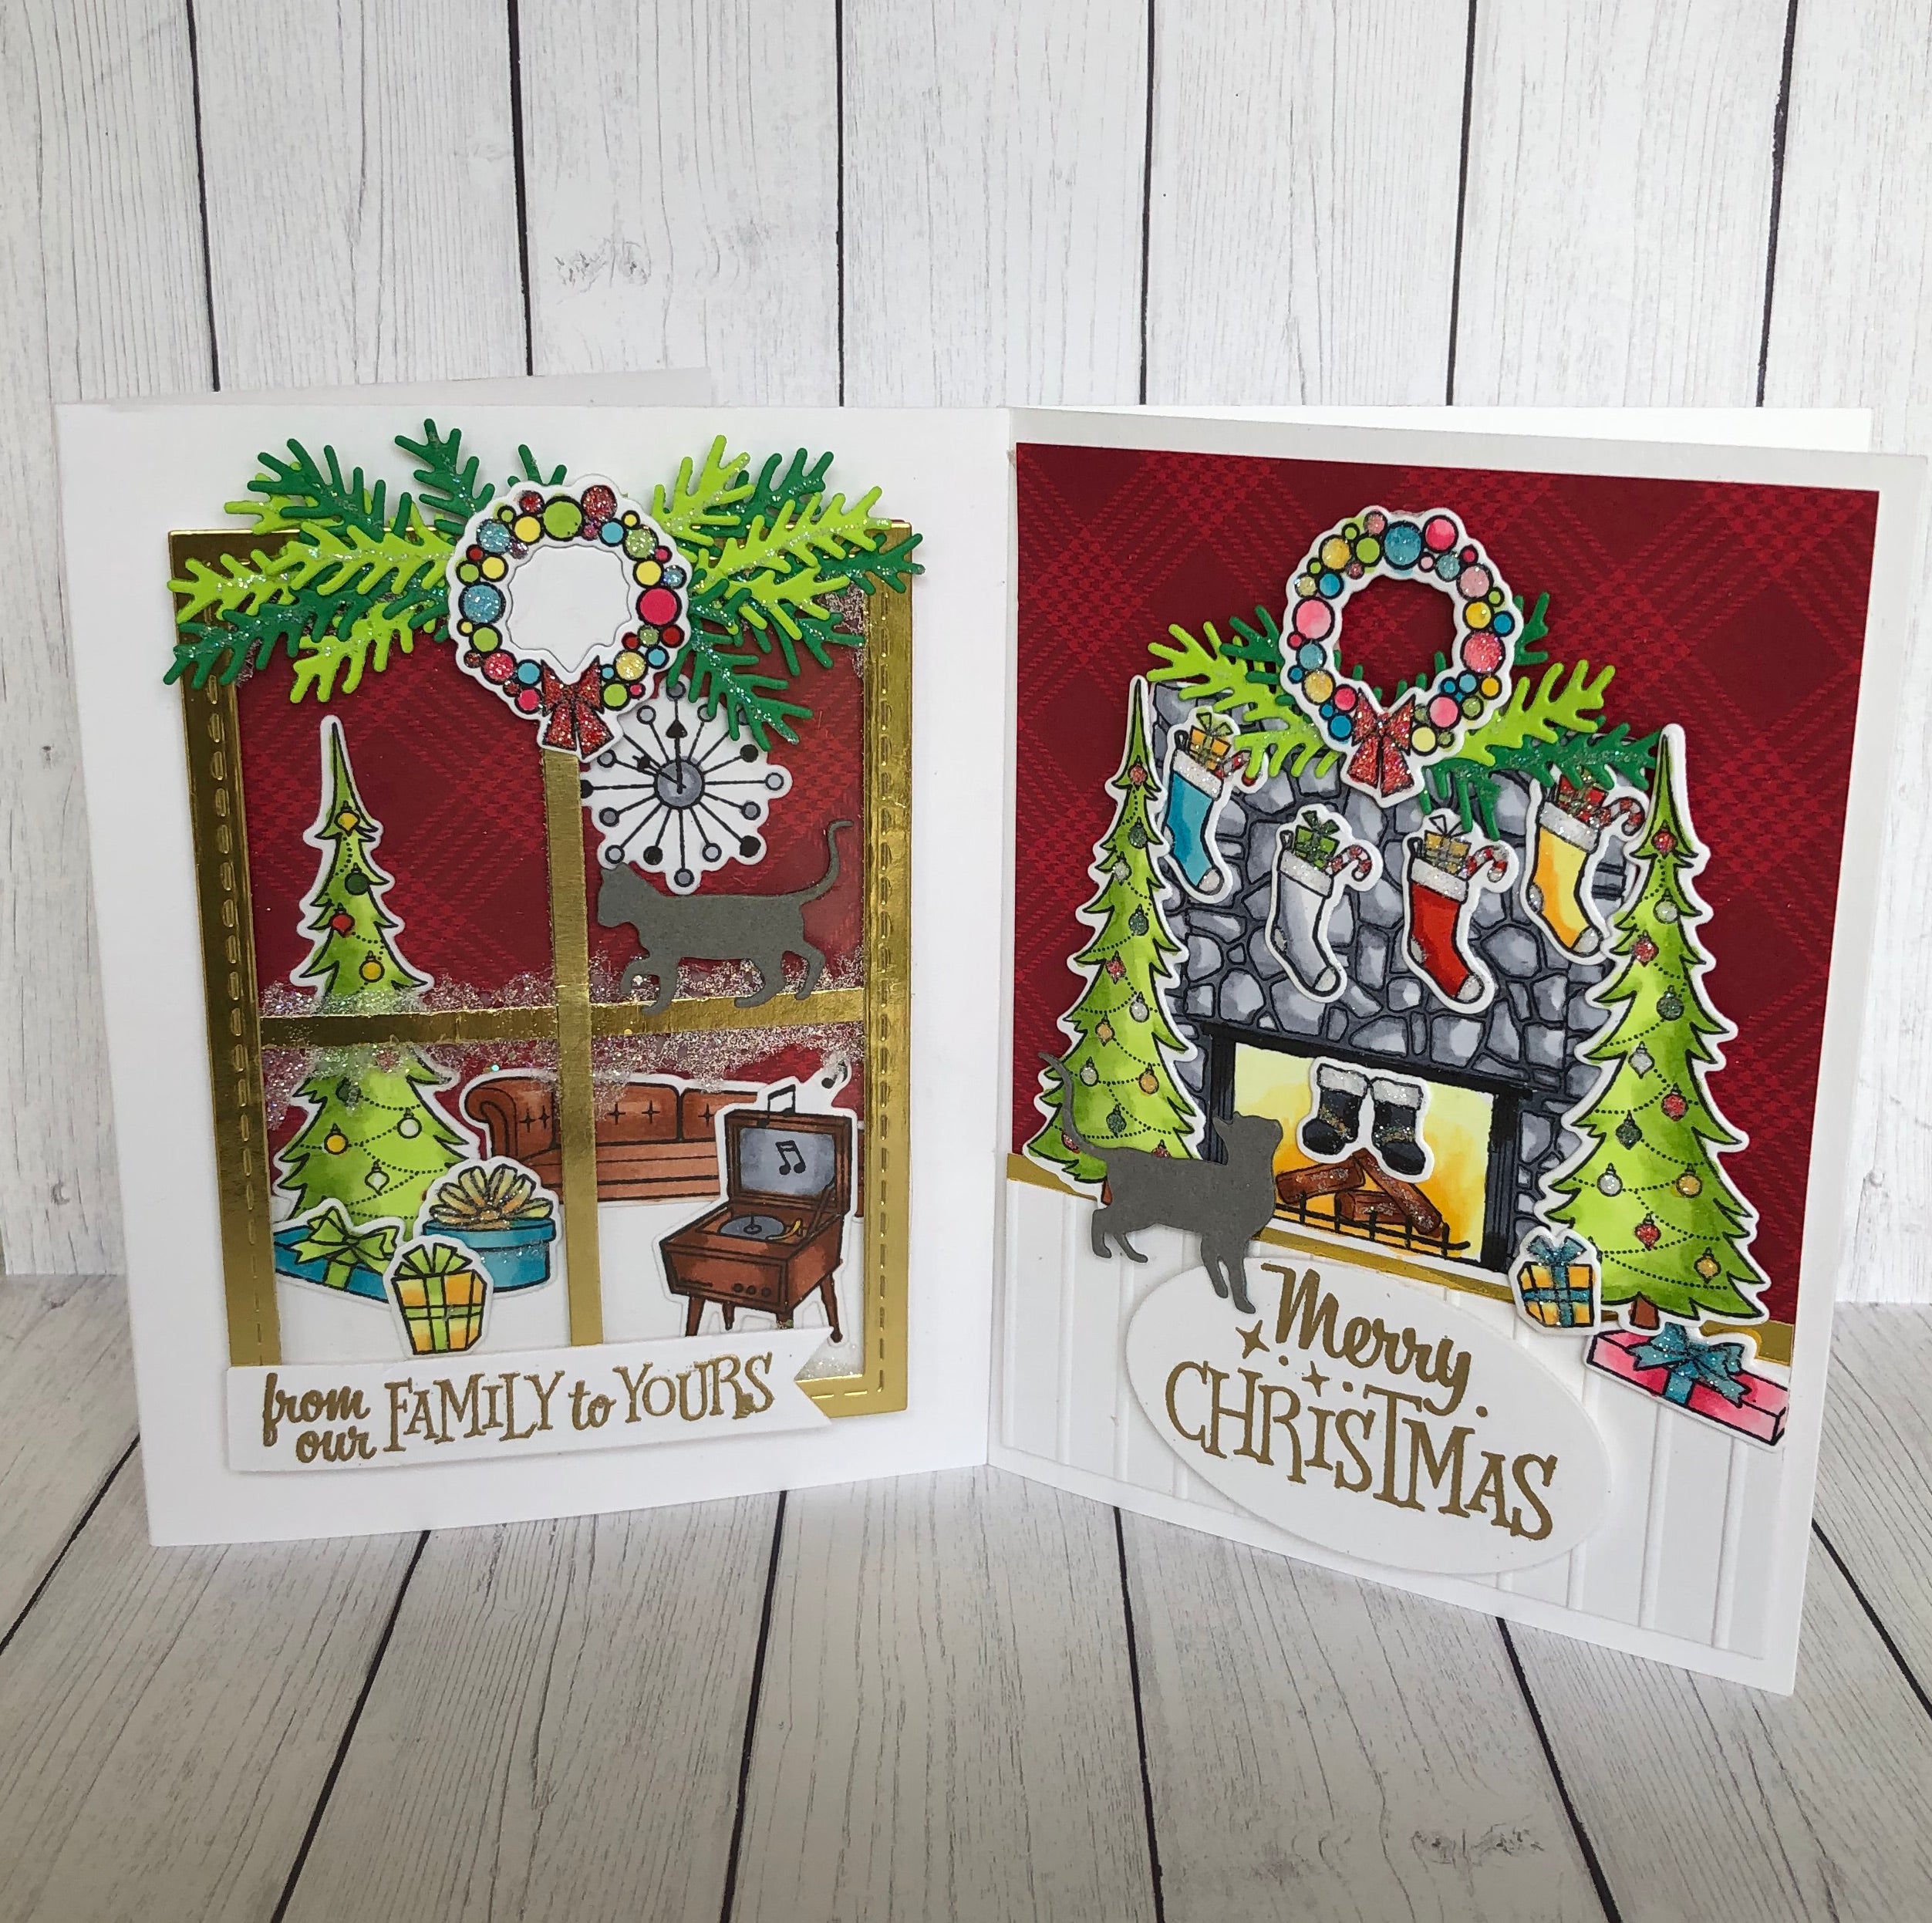
This is such a cozy looking scene. I love the traditional and non-traditional elements on this one. Obviously, theres a lot of red and green. However all of the colors are very neon bright, and I've included some pinks and turquoise colors. I wanted this card to look like a living room, so I tried to make my card layout look like a living room wall. I created the "crown molding" by dry embossing some lines onto some white card-stock. You can get this same look by adding scoring lines to your card-stock instead! For the wall paper, I used some red pattern paper from my stash. I cut the pattern paper down to 4 x 5.25 and added my white panel to the bottom. The white was roughly cut to 2.25 x 4 inches. To break up the two papers, I added a strip of gold card-stock in between. I created the scene using a few stamped and die cut images. I love the little santa boots coming down the fireplace! To draw viewers eyes to the boots, I added a small die cut cat in front of the fire place. She's super cute because she looks like she's looking up the chimney! The sentiment was gold heat embossed and die cut from an oval die. I popped up the sentiment on top of the striped white panel. The fireplace scene is also popped up with foam tape.
Card Three:


I think cards two and three pair beautifully together. The colors and papers coordinate on both the cards. I created this one by making another living room scene placed inside a beautiful hand cut window. The window was easy to create. All I did was die cut a gold rectangle frame using two stitched rectangle dies. I then cut two strips of thin gold card-stock and glued one in the center of the rectangle vertically, and one in the center of the rectangle horizontally so they intersect perfectly in the middle of the frame. Above the window I added some die cut pine branches as well as a wreath. The scene inside the window was created the same way as card two, just in a smaller scale. roughly 3.75 x 5 inches.
I decided to add some acetate behind the window. If you want to recreate this glitter technique you will need to add acetate behind yours! If you look closely, you'll notice that the window almost looks frosted. I created this look by scribbling down some glue (lay a thick amount) on the tops and bottoms of each window pane and sprinkling on some chunky glitter I had in my stash. I like the chunky glitter because it dries back more white so it looks sort of like ice. However, you can use the glitter that came in the kit instead! This look is also stunning using all white glitter. That effect looks more like sitting snow. Please let me know if you give the technique a try, I do it all the time for my winter cards! In case you were wondering, I learned this technique from a Heartfelt Creations class. If you want to see how they use the technique check out this link: "EZ Tips to Create Your Own Warm & Cozy Window Scene"
Card Four:


Can you believe this card doesn't have any glitter? When I was scouring Pinterest for some ideas, I came across a fun 1950s television. I thought hmm, I could make that? And sure enough I did! Does it look like a tv? eh I don't know, but it definitely looks like it could maybe pass as a vintage radio? The tv was super easy to create, and believe it or not I didn't use any dies! Apart from the silver "screen", which I did die cut from a stitched square die. However, you could easily cut your own square instead! Inside the screen of the tv, I created a black and white Christmas scene using a few stamped images. Make sense, right? I'm trying to create a retro 50s Christmas card. Back then all the channels were in black and white! I added my sentiment next to my TV screen. I white heat embossed it onto some black card-stock and trimmed it to a small rectangle. I created the dial and buttons on my tv using some circle punches and a thin strip of silver mirror card-stock. The Tv base was cut to 5x 3.75 inches from some red card-stock. I adhered the tv onto some black and white polka dot paper to further tie in the black and white theme. This card is super creative and fast to make. I love the black and white with the pop of red!
Card Five:


Card five features a completely different color scheme. While I prefer traditional Christmas colors, even I'll admit that this card turned out super cute and girly. The pattern paper I cut to 4 x 5.25 inches. The oval was die cut from some white card-stock. To add some interest, I stamped some snowflakes in pink ink inside the entire oval. I also went around the edges using the same pink ink. I added some of the silver mirror card stock that came in the kit to the bottom of the oval to ground my pink chevy. Doesn't this look like a barbie car? In front of the car, I added a few presents and I attached a teal tree to the top of the car. Oh and of course, all of the images have some glitter! I popped the oval up onto the pattern paper using foam tape and added my sentiment to the bottom left of the card. I did silver heat emboss the sentiment inside a white die cut banner. To finish the card, (and also say I used everything that came in the kit) I sprinkled on some snowflake sequins.
Video
Supplies
NOTE: I am using affiliate links for some of the products listed below. If you decide to use these links, know that I will receive a small commission off of your purchase. This is no added cost to you as the consumer, it's just a way for us crafty friends to support one another! Know that some of the items I use have been in my stash for years, therefore some items may be retired or no longer sold. However, I do disclose alternative options that are very similar to the products that I used.
Yay the Hero Arts October 2019 card kit is still available! Below I've provided links to the kit as well as the extra supplies that I used in today's video
Card One:
- PW101 Silver Embossing Powder
- Tim Holtz “Faded Jeans” Distress ink
- Tim Holtz “Black Soot” Distress ink
- Tim Holtz "Broken China" distress ink
- Sakura "White Medium Point" Gelly Roll Classic gel pen
- Elizabeth Craft Designs "Igloo" die cut
Card Two:
- Hero Arts “PW100 Gold” embossing powder
- Kaisercraft "Striped" embossing folder ALTERNATIVE
- Gina Marie "Kitty Cats" variety dies
- Simon Says Stamp "Pine Needle Trio" wafer dies ALTERNATIVE
Card Three:
- Hero Arts “PW100 Gold” embossing powder
- Gina Marie "Kitty Cats" variety dies
- Memory Box “Stitched Rectangle Trimmings” die set
- Creative Expressions "Cosmic Shimmer" frosty glitter
- Simon Says Stamp "Pine Needle Trio" wafer dies ALTERNATIVE
Card Four:
- My Favorite Things “Stitched Square Stax” die set
- Hero Arts "PW110 White" embossing powder
- Lawn Fawn "Small Stitched Circle Stackables" lawn cuts ALTERNATIVE
Card Five:
- Memento “Angel Pink” ink (dewdrop)
- PW101 Silver Embossing Powder
- Heartfelt Creations banners and arrows
1 Comments
Hi. On your black & white tv card….maybe try attaching the antenna with a brad. That way you can put them down to get the card in the envelope and people can move them around like real ones. 😊