
0 Comments
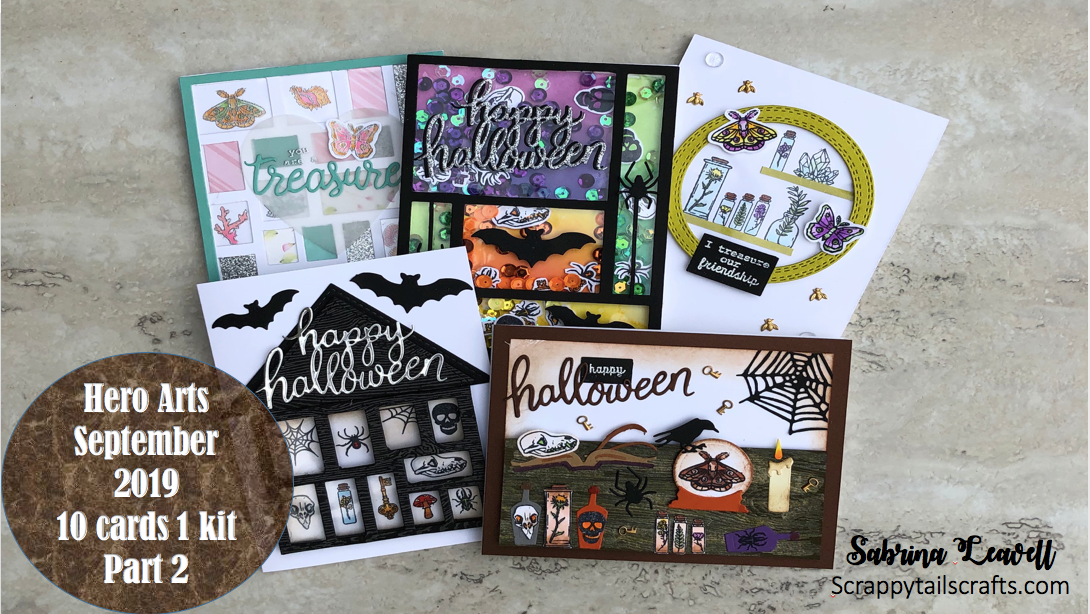
Hero Arts September 2019 | 10 cards 1 kit | Part 2
Hello crafty friends and welcome! Today I am featuring 5 more cards that I created with the Hero Arts September 2019 card kit. I must say that the September kit may be my favorite that Hero Arts has released this year. One of the reasons I was really drawn to this kit is because you can create so many different types of cards using the flap die with the coordinating stamp set. The stamp set includes many Halloween images, but it also has some nautical icons, as well as some plants, crystals and butterflies, which can work for any occasion. Normally, I spend between 20-45 minutes on each card when I work with a kit. However, each of these cards took well over an hour to create. Even though these cards were each a labor of love, I'm really happy with how they turned out, and if you enjoy the process then it's totally worth it right? Let me know in the comment section which card is your favorite!
Card Six


For card one, I created a Halloween shadow box house using the frame die, stamp set and the black wood grain embossed cardstock that came in the kit. I die cut just a portion of the background die from the wood grain paper. I was happy that I was able to utilize just a portion of the die instead of the entire thing. To create the unique shadow box design, I stamped and colored the images inside the box with my copic markers. I added some vintage sepia around the images to make the contents of the box look old. I added 2 layers of black fun foam behind the wood grain panel. The fun foam was die cut the exact same way. I figured using fun foam would be easier than trying to cut small strips of foam tape. Plus, fun foam is slightly thicker than foam tape so this enabled my shadow box to have a lot of dimension. To create the roof, I die cut half of a stitched square from the same wood grain cardstock. When you just use half of a square your left with a fun triangle roof shape. I die cut a larger triangle from some black cardstock to place underneath the wood grain one, which I decided to pop on top with a single layer of foam tape. To finish the house, I glued down a silver foil "Happy Halloween" die cut.
Card Seven


Now I know not everyones a fan of Halloween like I am, so I tried to create a few cards that weren't Halloween themed. Card two has a shabby chic look to it and can work for any occasion. I started this card by die cutting the fancy die from some white card stock, and trimming out all the flaps. Of course, I added some acetate behind this panel. I didn't stamp the coordinating stamp on top, but I do think that would be pretty embossed in silver. Then similar to card one, I placed some pattern paper behind the windows. I also added some turquoise paper and silver glitter card-stock underneath a few. The glitter really adds an interesting texture to the card. Underneath some of the windows I silver heat embossed a few of the images from the stamp set and colored them in with my copic markers. After everything was colored, I adhered my white window frame on top. Over the white frame, I added a turquoise border frame. I created the frame by die cutting the fancy frame from turquoise card-stock and trimming out all the inner pieces until I was just left with the frame. To create my sentiment, I die cut a heart from some vellum. On the vellum, I silver heat embossed "You are a" and added a turquoise "treasure" die cut right underneath so the sentiment reads "You are a treasure". Overall, I love how girly and pastel this card is. I also really enjoy the silver and turquoise touches on this card.
Card Eight


Okay card eight is definitely my favorite out of the 10 I created. I love the bright colors and the shine from all the sequins. Believe it or not but the black window frame on this card was created from the fancy die that came in the kit! All I did was cut out the smaller rectangle flaps that were inside a larger rectangle on the die. Hopefully that makes sense! The best suggestion I have to creating this background is to just look at your die cut, find some large rectangles, and cut away the excess. To create the colorful sections underneath the die, I used a pencil to trace each rectangle onto a 4.25 x 5.5 inch white Nina panel. Then using copy papers as masks, I colored each rectangle using various Distress oxide inks. Once everything was dry, I added color coordinating sequins to each section, as well as a few of the halloween icons that came in the kit. I colored them in to match their designated rectangles! After attaching my black die cut frame on top of the Nina panel to create my shaker, I worked on my die cuts. I added some die cut bats and spiders onto each of the rectangles. I gave the spiders some hand cut black strips behind them to look like they were stringing a web. On top of the purple rectangle, I added my "Happy Halloween" sentiment. I created the sentiment by offsetting a black "Happy Halloween" underneath the silver glitter one.
Card Nine


Card nine has a fun, clean and modern look to it, and it was fairly easy to create. I created the focal point by die cutting a circle stitched frame from some lime green shimmer card-stock. I of course, added acetate behind the frame. I like how acetate almost looks like glass. Behind the window frame, I create a little shelf full of some of the icon images that came in the kit. I chose the plants and crystals for this card. My aim, was to try and create those modern circular shelves I seem to see everywhere lately! On top of the circle, I added two butterflies and the sentiment "I treasure our friendship" which was white heat embossed on black card-stock. I actually used one of the flaps I cut off from card eight to emboss my sentiment. Those little rectangles are perfect for sentiments! To finish the card, I added a few metal bees and clear droplets.
Card Ten


I couldn't help it. I had to create another Halloween for my final card. Card ten was inspired by card two, the trifold witch cabinet I made. I really loved the vintage die cut elements from that card, and wanted to incorporate them into this one. I die cut some potion bottles, a spider, crystal ball, a book, spider web and a candle. I added most of the die cuts onto my table, which I created from the bronze metallic ink and the wood grain embossed paper that came in the kit. Onto the potion bottles, I added a few of the Halloween icons from the stamp set. I also stamped and colored a moth inside the crystal ball. To make the crystal ball look old, I added some vintage sepia around it. I also went around my entire white panel with the vintage sepia ink and a finger dobber. This panel was cut to 3.75 x 5 inches. To finish the table, I added a few of the test tubes from the stamp-set. I created the sentiment by die cutting the "Halloween word die from some of the brown shimmer card-stock that came in the kit. The "happy" sentiment was white heat embossed onto some black card-stock. To officially say that I used every single item from the kit, I decided to scatter around the metal keys that came in the kit. I matted the entire panel onto the same brown shimmer card-stock and attached it to my card base. This panel was cut to 4.25 x 5.5.
Video
Supplies
Supplies NOTE: I am using affiliate links for some of the products listed below. If you decide to use these links, know that I will receive a small commission off of your purchase. This is no added cost to you as the consumer, it's just a way for us crafty friends to support one another! Know that some of the items I use have been in my stash for years, therefore some items may be either retired or no longer sold. However, I do disclose alternative options that are very similar to the products that I used in the video. Yay the September Hero Arts card kit is still available! I would snag one now. I have a feeling this one will sell out.
My Monthly Hero September 2019 Card Kit
My Monthly Hero Kit Subscription
Card Six
Tsukineko Versafine “Vintage Sepia” ink pad
Cheerylynn Designs "Bat Family" dies:
Card Seven
Gina K Designs "Silver" fine detail embossing powder
Simon Says Stamp "Silver" glitter cardstock
Spellbinders “Nestabilities Classic Hearts” ALTERNATIVE
Card Eight
Cup Sequins "Go Green" sequin pack
Cup Sequins "Viola" sequin pack
Cup Sequins "Citrus" sequin pack
Tim Holtz Sizzix "Regions Beyond" thinlit dies (spiders)
Cheerylynn Designs "Bat Family" dies
Tim Holtz "Seedless Preserves" Distress oxide ink
Tim Holtz “Salty Ocean” Distress oxide ink
Tim Holtz “Squeezed Lemonade” distress ink
Tim Holtz “Twisted Citron” distress oxide
Tim Holtz "Lucky Clover" distress oxide ink
Tim Holtz "Candied Apple" distress oxide ink
Tim Holtz "Wild Honey" distress oxide ink
Card Nine
Hero Arts "PW110 White" embossing powder
Pretty Pink Posh "4 MM Clear Droplets":http://shrsl.com/1tvwn
Lawn Fawn “Outside in Stitched Circle Stackables” lawn cuts ALTERNATIVE:
Card Five
Tim Holtz Sizzix "Regions Beyond" thinlit dies
Tim Holtz Sizzix "Frightful Things" thinlit dies
Hero Arts "PW110 White" embossing powder
Challenges
This blog post is a submission for the Simon Says Stamp Wednesday Challenge: Interactive