
2 Comments
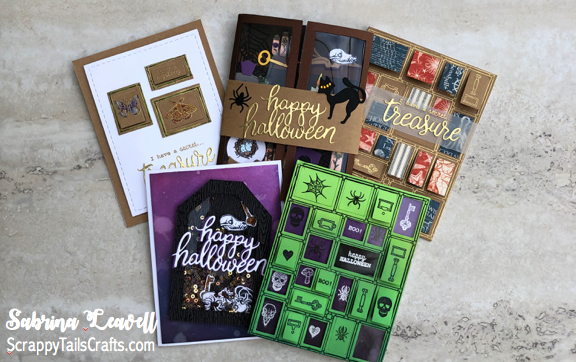
Hero Arts September 2019 | 10 cards 1 kit | Part 1
Hello and welcome! Today I am featuring the first 5 cards that I created with the Hero Arts September 2019 card kit. I must say that the September kit may be my favorite kit that Hero Arts has released this year. One of the reasons I was really drawn to this kit is because you can create so many different types of cards using the flap die with the coordinating stamp set. The stamp set includes many Halloween images, but it also has some nautical icons, as well as some plants, crystals and butterflies, which can work for any occasion. Normally, I spend between 20-45 minutes on each card when I work with a kit. However, each of these cards took well over an hour to create. Even though these cards were each a labor of love, I'm really happy with how they turned out, and if you enjoy the process then it's totally worth it right?
These 5 cards were created with the stamps, peek-a-boo die, and word dies that came in the kit. For all 5 A2 sized cards, I created my own card bases with 110 lb white Nina card-stock. Most of my cards feature embossing, with minimal coloring (I know crazy right?) If you're interested to see an in-depth tutorial on how I created these cards check out my video below. I'm happy to report that the kit is still available! If you're interested in picking up a kit, I would grab one now, I really think this kit may sell out! Links to purchase the kit and other supplies used on today's cards are listed below. Now I must know, which card is your favorite?
Card One


I was immediately drawn to the sea shells that came in the kit and I thought it would be fun to create a nautical inspired card using them. I started this card by gold heat embossing the background stamp onto some kraft card-stock. I also gold heat embossed some of the handle and key images on top of a few of the flaps. I left most of the flaps bare, that way I can glue some pattern paper on top. I chose Graphic 45 nautical themed paper. I die cut the pattern papers from the same flap die. I then cut the small rectangles from the pattern paper and attached them onto the kraft panel. Underneath the flaps, I did the same thing. Some of the rectangles have pattern paper, while others have hidden seashells, coral and friendship themed sentiments. Those were also gold heat embossed on kraft paper. I did color in the seashells and coral with my copic markers. The sentiment on this card was created by die cutting the "treasure" word die from gold foil card-stock. I glued it onto some vellum, which helped to mute down the busy pattern paper underneath it. I also gold heat embossed the sentiment "I have a secret..." All together the sentiments reads "I have a secret treasure". This card is a lot of fun because it's intended for the recipient to find the sea shell treasures underneath the all the flaps. I stamped a lot of the images twice. My intention was to have it be a fun matching game for the recipient!
Card Two


This witch cabinet card is one of the most unique and time intensive. All in all, this card probably took a good two hours to create. I started by creating the trifold card base by scoring at 2 1/8 on either side of an 8.5 inch wide brown shimmer panel. (This paper came in the kit) Using my paper trimmer, I cut rectangles from both sides of the trifold to create the doors of the cabinet. I left a quarter of an inch brown border around both of the doors. Behind the doors, I added some acetate. To hide the glue seen behind the acetate, I decided to adhere two more brown rectangle frames on the inside. These rectangles were cut to 2 1/8 x 5.5. I created the frames the same way as the front doors by cutting a smaller rectangle inside each one, leaving a quarter of an inch brown border around each side. I gold heat embossed some handles onto the same brown card stock and attached them to both doors. To create the interior of the card, I adhered three strips of the same shimmer card-stock. Then I went to town die cutting a whole bunch of images from a Sizzix Halloween die set I had in my stash. These images include a raven, crystal ball, potion bottles, candles, keys, spiders, spider webs, a book and a black cat. I adhered everything flat onto the shelves. I decided to incorporate some of the icons that came in the stamp set onto some of the potion bottles to make them look spooky. I also stamped, colored and fussy cut some of the flower test tubes and glued them inside the cabinet. I colored them brown, to try and make them look very old. I also decided to add a skull head on top of the book in the cabinet. Now at this point, I realized my card wasn't staying closed, so I decided to create a belly band to solve the problem. I created the belly band by folding a 8.5 x 2.25 inch kraft strip around the card base. To dress it up, I added a gold foiled "Happy Halloween" die cut, a black cat and a spider. WHEW that's it! Not complicated at all right?
Card Three

The spooky cards continue on with card number three. For this card, I decided to create a coffin shaker card. I created the coffin by hand, however a tag die should also work since they're similar in shape. The dimensions of my coffin are: 3 inches across the bottom. 3.5 inches high on each side, 1.5 inch diagonal notches and 1 inch connecting the two diagonal cuts. I cut out the center using a wire trimmer leaving a quarter of an inch all around. The shaker bits inside the coffin are: small gold and black sequins, and purple, black, iridescent seed beeds. To give the coffin a spooky vibe, I added a few of the small Halloween icons from the stamp set inside the coffin shaker. To finish the shaker, I adhered a purple and white "Happy Halloween" word die cut on top. The background behind the coffin was created with seedless preserves, salty ocean, and black soot distress oxide ink. I added some water splatters to the background just to give it some interesting texture.
Card Four


After doing three time consuming, and somewhat complicated cards, I wanted to create a more simple design for card four to demonstrate the versatility of this kit. The background fancy die can be seen as overwhelming, (at least it was for me). I wanted to see if I could utilize the die to create three small peek-a-boo frames instead of an entire background. Luckily, I was able to do that just by snipping three rectangle flaps off the background die cut with my scissors. The rectangles were gold heat embossed on kraft cardstock. Onto each rectangle, I stamped some butterflies and an "it's a mystery" sentiment. I colored the two butterflies in with some prisma color pencils. Underneath the hidden flaps, I decided to hide another message that says "I treasure our friendship" and a leaf and feather image, which were also colored with my color pencils. I then adhered my rectangle flaps onto a 3.75 x 5 inch white stitched rectangle panel. I gold heat embossed the sentiment "I have a secret..." Underneath, I glued a gold foil "treasure" die cut. After that, I layered my white panel onto a 4.25 x 5x5 inch kraft panel and adhered everything onto my card base.
Card Five


I couldn't help it, I had to create another Halloween card! For this one, I stamped and clear heat embossed the background stamp and a few Halloween icons onto some green card-stock. I left most of the rectangles blank, as I knew I'd cut those out later for the purple panel to peek through. On the purple panel, I stamped and embossed the same icons with black and white embossing powder. To finish the card, I added some acetate behind my window panel (of course) and popped it up onto the purple panel with foam tape. This card is a lot of fun because some of the rectangles are flaps, which you can lift up to reveal hidden images, while some are open. Overall, this card screams Halloween and I love the fun bright neon green and dark purple color scheme along with the black and white embossing!
Video
Supplies
NOTE: I am using affiliate links for some of the products listed below. If you decide to use these links, know that I will receive a small commission off of your purchase. This is no added cost to you as the consumer, it's just a way for us crafty friends to support one another! Know that some of the items I use have been in my stash for years, therefore some items may be either retired or no longer sold. However, I do disclose alternative options that are very similar to the products that I used.
Yay the September Hero Arts card kit is still available! I would snag one now. I have a feeling this one will sell out.
If you're interested in purchasing an item or two, just hover over the item name and click!
Card One
Card TwoCard Three
- Tim Holtz “Salty Ocean” Distress oxide ink
- Tim Holtz “Black Soot” Distress oxide ink
- Tim Holtz "Seedless Preserves" Distress oxide ink
- Recollections metallic sequins
- Recollections microbead basics
Card Four
Card Five
- WOW Clear Embossing Powder
- Recollections "Snow" embossing powder
- Tim Holtz "Lucky Clover" distress oxide ink
Challenges
- This blog is a submission for the Simon Says Stamp Monday Challenge: Monochrome
- This blog is a submission for the Simon Says Stamp Wednesday Challenge: Interactive
2 Comments
I came across AllMachines while looking for brand-specific equipment info. The page on Cat Excavators has a clear breakdown of models, and I found the John Deere Excavators section really helpful too. There’s also a section on Bobcat Loaders with specs you can compare easily, plus a useful page for John Deere Loaders as well.
Cialis Erboristeria enrolafrorne https://bbuycialisss.com/# – buy cialis online canada Keettypoegut Cialis Generique Comparer Prix acceta Buy Cialis erorrelf Achat Kamagra En Belgique