0 Comments
Ink Smooshing to Create a Realistic Brick Background
Hi everyone, Nancy here sharing a card I created using
some Scrappy Tails die sets!
I had planned to take some "in progress" photos for you
but I was having so much fun that I forgot! ;o)
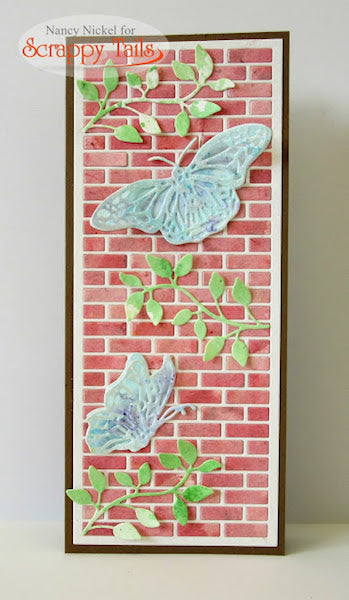
Here's my card:

Here's what I did:
First, I make my kraft cardstock a slimline card base.
Next, I took three pieces of heavy weight watercolor paper.
I used the ink smoosh technique with my water soluble crayons.
If you're not familiar with this technique, I will explain.
If you're not familiar with this technique, I will explain.
With the red/rust/brown crayons, I scribbled on my glass mat.
I misted it well with water, and let it sit for a few seconds.
I misted it well with water, and let it sit for a few seconds.
I then used a scrap piece of clear acrylic to pick up the color.
I then laid the acrylic onto the watercolor paper, transferring the color.
I continued this process until I had a final colored piece that I liked.
I then laid the acrylic onto the watercolor paper, transferring the color.
I continued this process until I had a final colored piece that I liked.
Then I set it aside to dry.
I repeated this process with various greens,
and then again with some blues/purples.
When the colored watercolor pieces were all dry,
I repeated this process with various greens,
and then again with some blues/purples.
When the colored watercolor pieces were all dry,
I proceeded with my die-cutting.
I cut the Slimline Brick Background Metal Craft Die twice.
Once from plain watercolor paper, and once from my red colored piece.
I took all the bricks from my red piece and mixed them up.
Once from plain watercolor paper, and once from my red colored piece.
I took all the bricks from my red piece and mixed them up.
I then laid Tape Runner adhesive all over my kraft card base,
leaving the small border edge clear.
First, I laid the plain watercolor frame onto the adhesive on the card front.
Then I proceeded to place all the red bricks back into the plain frame.
This way there is not uniform shading, and it looks more like a brick wall.
It was so much fun to do!

Next, using the green piece, I die-cut some leaves from the Assorted Leaves Metal Dies.
I curled and shaped the leaves, and adhered them in place on my brick wall.
Then, using the blue/purple piece,
I die-cut the butterflies from the Flying Butterflies Metal Craft Die.
I adhered the butterfly backgrounds in place on the bricks.
With the detailed butterfly cuts, I folded up the wings,
and adhered just the body in place on the background.
Finally, I added stickles to the butterfly wings for some pretty sparkle!

This card has so much wonderful dimension!
It's such a great combination of dies!
It's such a great combination of dies!
The creative possibilities are endless!
* * * * *
Scrappy Tails Products Used:
Slimline Brick Background Metal Craft Die
Flying Butterflies Metal Craft Die
* * * * *
Thanks so much for stopping by today!
I'll be back soon with another fun project share!
Nancy :o)
Follow Nancy on Social Media!
