
0 Comments
Must Try Technique - Layered Stencil and Die Combos
Video Tutorial
It's a long one, but if you want to see the full coloring/stenciling process to see these butterflies come to life with Distress Oxide inks, be sure to watch my video tutorial above!

My butterflies were all stenciled with Distress Oxide inks. You can obviously use whatever inks you have in your stash! My favorite part was mixing and matching my different inks to create different color combos. These butterflies are a great way to swatch and learn which colors work well together! It was such a relaxing and enjoyable experience for me!
Some of my butterflies have gold and silver details. I did this by blending Versamark ink through the final detail layers of each stencil, sprinkling embossing powder over those layers, and heat setting. My only tip for heat embossing is to allow all the ink underneath to fully dry!

I absolutely love our new stencil and butterfly die combos. The stencils allow you to ink blend beautiful patterns onto the butterfly wings, and the die provides even more detail with etched cut lines on the wings.
After die cutting each butterfly, I embellished their wings with a variety of Scrappy Tails embellishments. I mainly used gems, but some butterflies have pearls!

I ended up stenciling and die cutting over 25 butterflies to use on my cards. Therefore, I decided to create multiples of the same card design to use them up. With that being said, I did make them look slightly different, by changing up the colors, the pattern papers and the butterflies that I used on each card!
In addition, each of our butterfly stencil and die combos include a word die and a coordinating shadow die. It's always nice to have word dies, so I included them in each set and in a few of my card designs today.
Now, Let's take a closer look at each card!

One last thing- the Hello butterfly stencil and die combo is included in this month's "Butterfly Kisses" card kit. I also used the pattern paper and the embellishments that are included in the card kit on a lot of my cards today!
My first card design is an A7 size. I used a yellow pattern paper in the background, on top, I added a cream fancy oval. In the center, I added a solid gradient oval that I die cut from another pattern paper. On the solid oval, I added a pink and purple butterfly and my "Hello" die cut.
DISCLAIMER: Many of my die cut pieces are layered with multiple die cuts for added dimension. I very rarely add foam tape to my cards these days!
Finally, I embellished the card with a scattering of our new "Butterfly Wings" embellishment mix.

As mentioned, I repeated a few of my card designs. Here's another rendition of my last design with different pattern papers, colors and a larger pink butterfly.

This next design is my favorite. I used the same fancy oval to create an A2 shaker card. To turn my oval into a frame, I inserted the solid oval inside the fancy one and ran it through my die cut machine at the same time. I die cut four of these frames from heavy weight, 110 lb cream card stock to build the shaker walls. Before gluing my fourth frame, I added acetate behind it to create my shaker window.
Behind the shaker window, I ink blended purple ink onto a pink card panel to create a gradient. For my shaker bits, I added a mix of "Spring Flower Breeze" and "Amethyst" embellishments. I closed the shaker with my stacked oval frame window. The stacked die cuts allow the pearls and gems to freely move inside.
Finally, I added two butterflies and a stacked black "thank you" that I glued to the acetate window.

This shaker is slightly different, instead of using the fancy oval frame, I cut a simple solid oval frame from dark purple card stock. Behind it, I glued acetate to create my shaker window. Then, I glued two heavy weight white oval frames behind to create the shaker walls.
Inside my shaker, I used the flower enamel pieces from the same "Spring Flower Breeze" embellishment mix.
To the center of the oval, I added a stacked "I love you". I wanted the pattern paper to shine on this card, so I only added a single butterfly to this card.

This next card is really pretty, I plan to make another one or two using my left over butterflies! The frame was cut from our new "Slimline Butterfly Swirl" die set. I stacked the gold frame on top of two heavy weight white ones for extra dimension. In the center, I added a blue pattern paper.
Then, I added three butterflies and a gold heat embossed "With deepest sympathy" sentiment.

That blue pattern paper was really speaking to me, so I decided to use it again for an A2 sized card. I accented the paper with a blue foiled frame and a "thanks" sentiment. Both of these come from our new "A2 Framed Butterfly" hot foil plates.
Above and below the sentiment, I added a butterfly. I love the monochromatic look of this card. I think it would be super cool to have a set of these in rainbow colors.

My sister card features a champagne gold foiled frame and sentiment along with a pink and purple butterfly.

Eager to use more pattern paper, I came up with this split card design. This includes a monochromatic print on the left and a busier print on the right. Between each paper, I added an embossed oval. I used a Swiss dot embossing folder to keep it subtle. On it, I glued another butterfly and a stacked "hello" silver die cut.
This card was finished off with a few silver gems.

Purple and yellow are such fabulous complimentary colors! Again, I found two coordinating pattern papers for the background, and chose a yellow butterfly to compliment them.

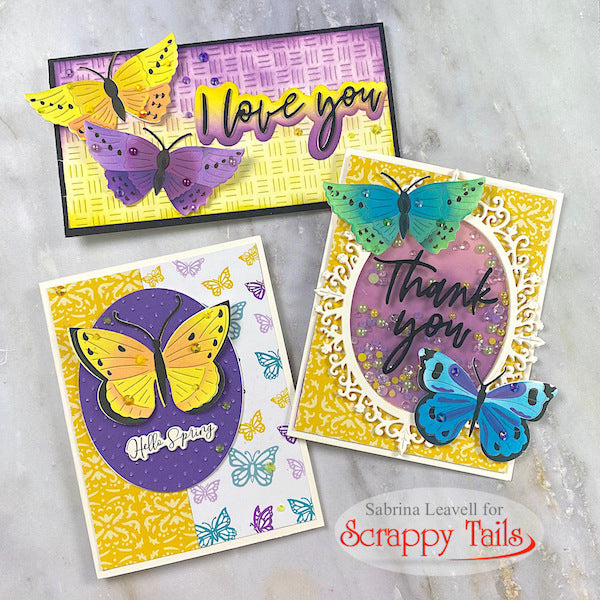
The blue and gold butterfly was one of my favorites, so I had to use it on this slimline card.
Again, I used the frame from the "Slimline Butterfly Swirl" die set to cut from gold mirror card stock. I used both the frame and the inside piece for this card. I felt the center piece needed a little something extra, so I ran it through my "Slimline Tiki Weave" background die. This added some nice texture to my card design.
On the panel, I added my butterfly and "thank you" word die. Both the thank you shadow die and background were ink blended with the same colors I used on the butterfly, "Chipped Sapphire" and "Blue Print Sketch".
Finally, I embellished the card with a scattering of our "Cobalt Blue" pearls.

I loved that tiki weave texture so much, I decided to use it again to create two final mini slimline cards. To add some color, I lightly ink blended Salty Ocean and Twisted Citron Distress Oxide inks to the top and bottom of my panel.
I used the same inks, with a heavier hand, to ink blend the shadow for my "Hello" die cut. Then, I added my two butterflies and embellished the card with "Ice Candy" and "lime green" gems.

Last one! This time, I ink blended "Dusty Concord" and "Squeezed Lemonade" Distress Oxide inks onto the tiki weave background panel and the I love you shadow die. I used a purple and yellow butterfly along with a black stacked "I love you" die cut.
This card was embellished with "Purple Rain" and "Lemon Yellow" gems.
Thank you again for stopping by, I hope you enjoyed my cards today. Have fun stenciling!
-Sabrina