4 Comments
New J'adore Collection + Purse Card Tutorial
Bonjour Scrappy Tails Crafters! We have a brand new release centered around all things girly: purses, shoes, fashion and love, perfect for all the gal pals in your life! I drew inspiration from the beautiful and romantic city of Paris. While our "J'adore" collection is a Valentine release, many of the products can work well all year!
J'adore Product Showcase
For a full product reveal and loads of inspiration, check out my product showcase video! Be sure to leave a comment to enter yourself for a chance to win one of two $50 gift cards to Scrappy Tails!
A7 Pop Up Purse Cards

Our new "A7 Pop up Purse" die set is perfect for all the fashionistas in your life. It folds flat for mailing and is perfectly sized to fit a gift card. I made so many purse gift bags, I plan on adding make up, gift cards, chocolates and embellishments inside them!
Video Tutorial
Learn how to create your own A7 pop up purse cards in my latest video tutorial. For more purse inspiration, check out my product showcase video!

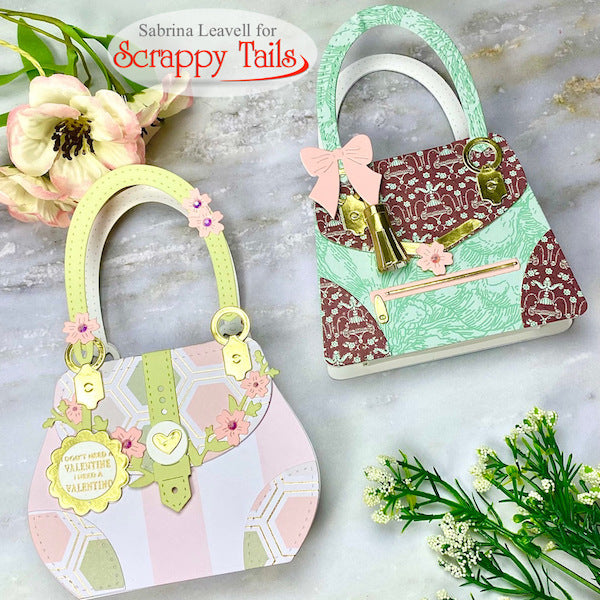
My first card uses dies from the new "A7 Pop up Purse" die set. I die cut the base, the decorative pieces and the purse flap from coordinating pattern papers. I decorated the front of the purse with a green buckle, some gold accents, and a few leafy flowers that I die cut from our "A7 Flower Cover plate" die set.
I decorated the purse straps with gold hardware and some more light pink flowers. To the buckle, I added a white die cut circle and a gold heart as a cute decorative touch.

For my sentiment, I thought it would be cute to have it look like a purse tag. I gold heat embossed a sentiment from our new "Designer Friend Sentiments" 3x4 stamp set onto a white circle. I backed it with a gold scalloped circle, and strung it from the purse handle.
Behind the heart buckle, I hid a flat magnet to hold my purse flap closed when the card is displayed. The magnets aren't necessary, I just like the professional look and feel of the card.
To make this card into a pop up, I die cut two pockets from the "A7 Pop up Purse" die set and assembled them together. Please check out my video tutorial to see how the pocket is made. On the front of the pocket, I glued the second magnet and one of my purse bases. On the back of the pocket, I glued my second purse base.
Finally, I glued my purse flap to the back of the card and allowed my magnets to completely close the flap on the front of the card.

My second card uses the pocket from the "A7 Pop up Purse" die set and the base piece, the purse flap and the decorative elements from the "Purse Accessory Add-on" die set. I die cut my base pieces from patterned paper and my accessory pieces from gold and light pink card stock.
I decorated the front of the purse with a zipper, a tassel and a bow. I decorated the purse flap with a gold closure and another pink flower.

I decorated the back of the purse with a pouch, some more flowers and a sentiment from our new "Designer Friend Sentiments" stamp set.
I decorated the straps with gold hardware.
I glued the purse bases to my pocket, and attached my purse flap to finish off the card. (I did use magnets again).
That finishes off my two cards today, I will be back soon with more video tutorials that feature new products from our J'adore collection! Thanks for stopping by!
-Sabrina

4 Comments
Beautiful purses, I am new to all this, how can I order these patterns to make these.
Thank you
Ana
Another fabulous design!
Love these purses!
What magnets do you use?
You forgot to mention it on the bottom of your video description.
Another fabulous design!
Love these purses!
What magnets do you use?
You forgot to mention it on the bottom of your video description.
Which magnets did you use for the purses. I love these. So clever!