
0 Comments
Northern Lights Ink Blended Background
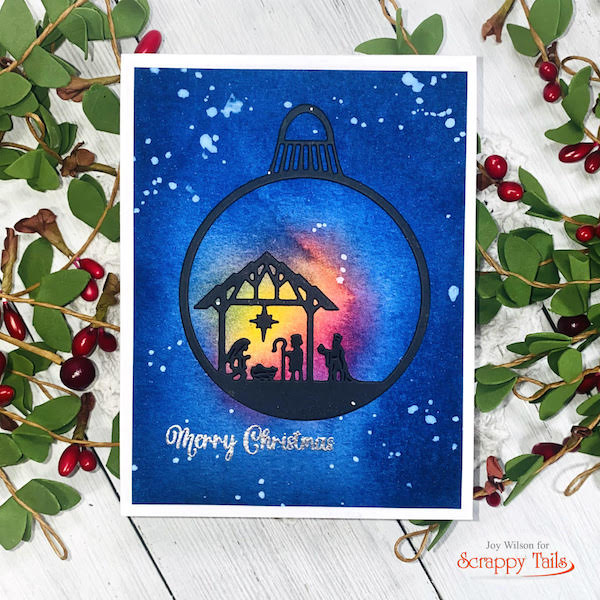
Hello crafters, Joy here with a beautiful Christmas card to share with you today featuring the Nativity Ornament and my favorite go-to techniques for mass producing cards. When making my holiday cards, I want each of them to appear custom and one of a kind, but I also want to be able to produce them quickly. Ink blending and die cutting allows me to do this. Let's take a look...

I started by trimming a watercolor panel to 4x5.25 inches and centered the ornament so that I would know where I wanted the yellow highlight. I started by adding Squeezed Lemonade Distress Ink where the star would be and then added Picked Raspberry, and Seedless Preserves to create a Northern Lights effect. I then blended Prized Ribbon and Chipped Sapphire to create the dark sky, which created a wonderful glow behind the Nativity Ornament.

To get that fun watercolor appearance, I spritzed the panel and let the colors meld together before drying it with my heat tool. Next, I adhered the ornament die cut and splattered the sky with water.
Before trimming the panel and adhering it to my card base, I embossed a "Merry Christmas" sentiment from the Scrappy Tails Crafts Christmas Icons 4x6 stamp set with silver embossing powder.
I hope that you have enjoyed this card and will give it a try! For more inspiration, please join us on the Scrappy Tails Crafts Facebook page! You will find stunning projects on the Scrappy Tails blog, Youtube, and on Instagram!
Bye for now!
Follow Joy on Social Media!