
0 Comments
Retro Christmas Tree Card Set


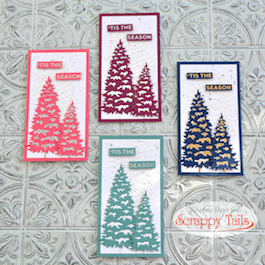
It was so hard to decide what to work with first but I absolutely LOVED the Winter Snow Trees dies. I thought they would be perfect for making a set of mini slimline cards! Let's take a sneak peek at the set.

Alrighty, let's jump into a brief tutorial.
Step 1: Cut lots of snowy trees out of assorted colors. My choices were vintage inspired.
Step 2 : Cut lots of solid trees out of white card stock.

Step 3: Glue tree layers together. Add sparkle with various micro fine and chunky glitters in your stash to the "snowy" areas of the trees and let dry.

Step 4: Create textured backgrounds. I used the Slimline Brick Background die to cut out a thick piece of card stock. I used this piece as a stencil for all four cards. Then, I used embossing paste through it.
As soon as each background was dry, I splattered each with coordinating ink splatters and metallic paints.

Step 5: Adhere each background to solid, coordinating card stock.

Step 6: Add your trees! The smaller tree is popped up with foam tape. I also added some tiny tree trunks to the bottom of each tree.


 Step 7: Add your hot foil sentiments and complete the cards. I used the Hot Foil Bold Christmas Sentiments and foam tape on the back.

Step 8: Admire your handiwork!

I Hope you love my mini slimline card set as much as I do!
Until next time,
Follow Kristina on Social Media!