
1 Comments
Spellbinders March 2020 | "Feeling Hoppy" |10 Cards 1 kit
Hi everyone! I hope you're all staying safe and hopefully making light of a difficult situation by catching up on some crafting. I hope my video was able to entertain you during this rough time. Business has been slow for me, so I decided to create 20 cards with the March 2020 Spellbinders card kit. Yes, 20 cards! Can you tell that I've been busy during quarantine? Essentially, I came up with 10 card designs, and each design I made twice. What's great about the Spellbinders kits is that you can most of the time create duplicate cards, because each ephemera piece comes in the pack twice. You'll notice that my duplicates aren't exactly the same. I normally change up the layout slightly or switch the papers I use so that they look a little different. For the purposes of shortening this blog post I will only talk about each card featured in my Youtube tutorial. I will say that it took me one whole day to make all 20 cards, but it may take more or less time for you to create 20. After all, we all work at different paces! Note, I used the colored card-stock from the kit as mattes for my card panels. I used my copic markers to color all the stamped images on my cards. Additionally, I did all my die cutting before I started assembling my cards. When I die cut ahead of time I find that I work faster and I'm more inclined to use my die cuts on my cards if I have them already cut and ready to be used. One tip I'd recommend when it comes to the Spellbinders kits is to group the different ephemera pieces before starting your cards. I normally group mine based on color, image (ex. florals, animals) or what is generally pleasing to my eye. Please, leave any questions or comments down below and I'll be sure to respond to you as soon as possible. Also, let me know which card was your favorite!
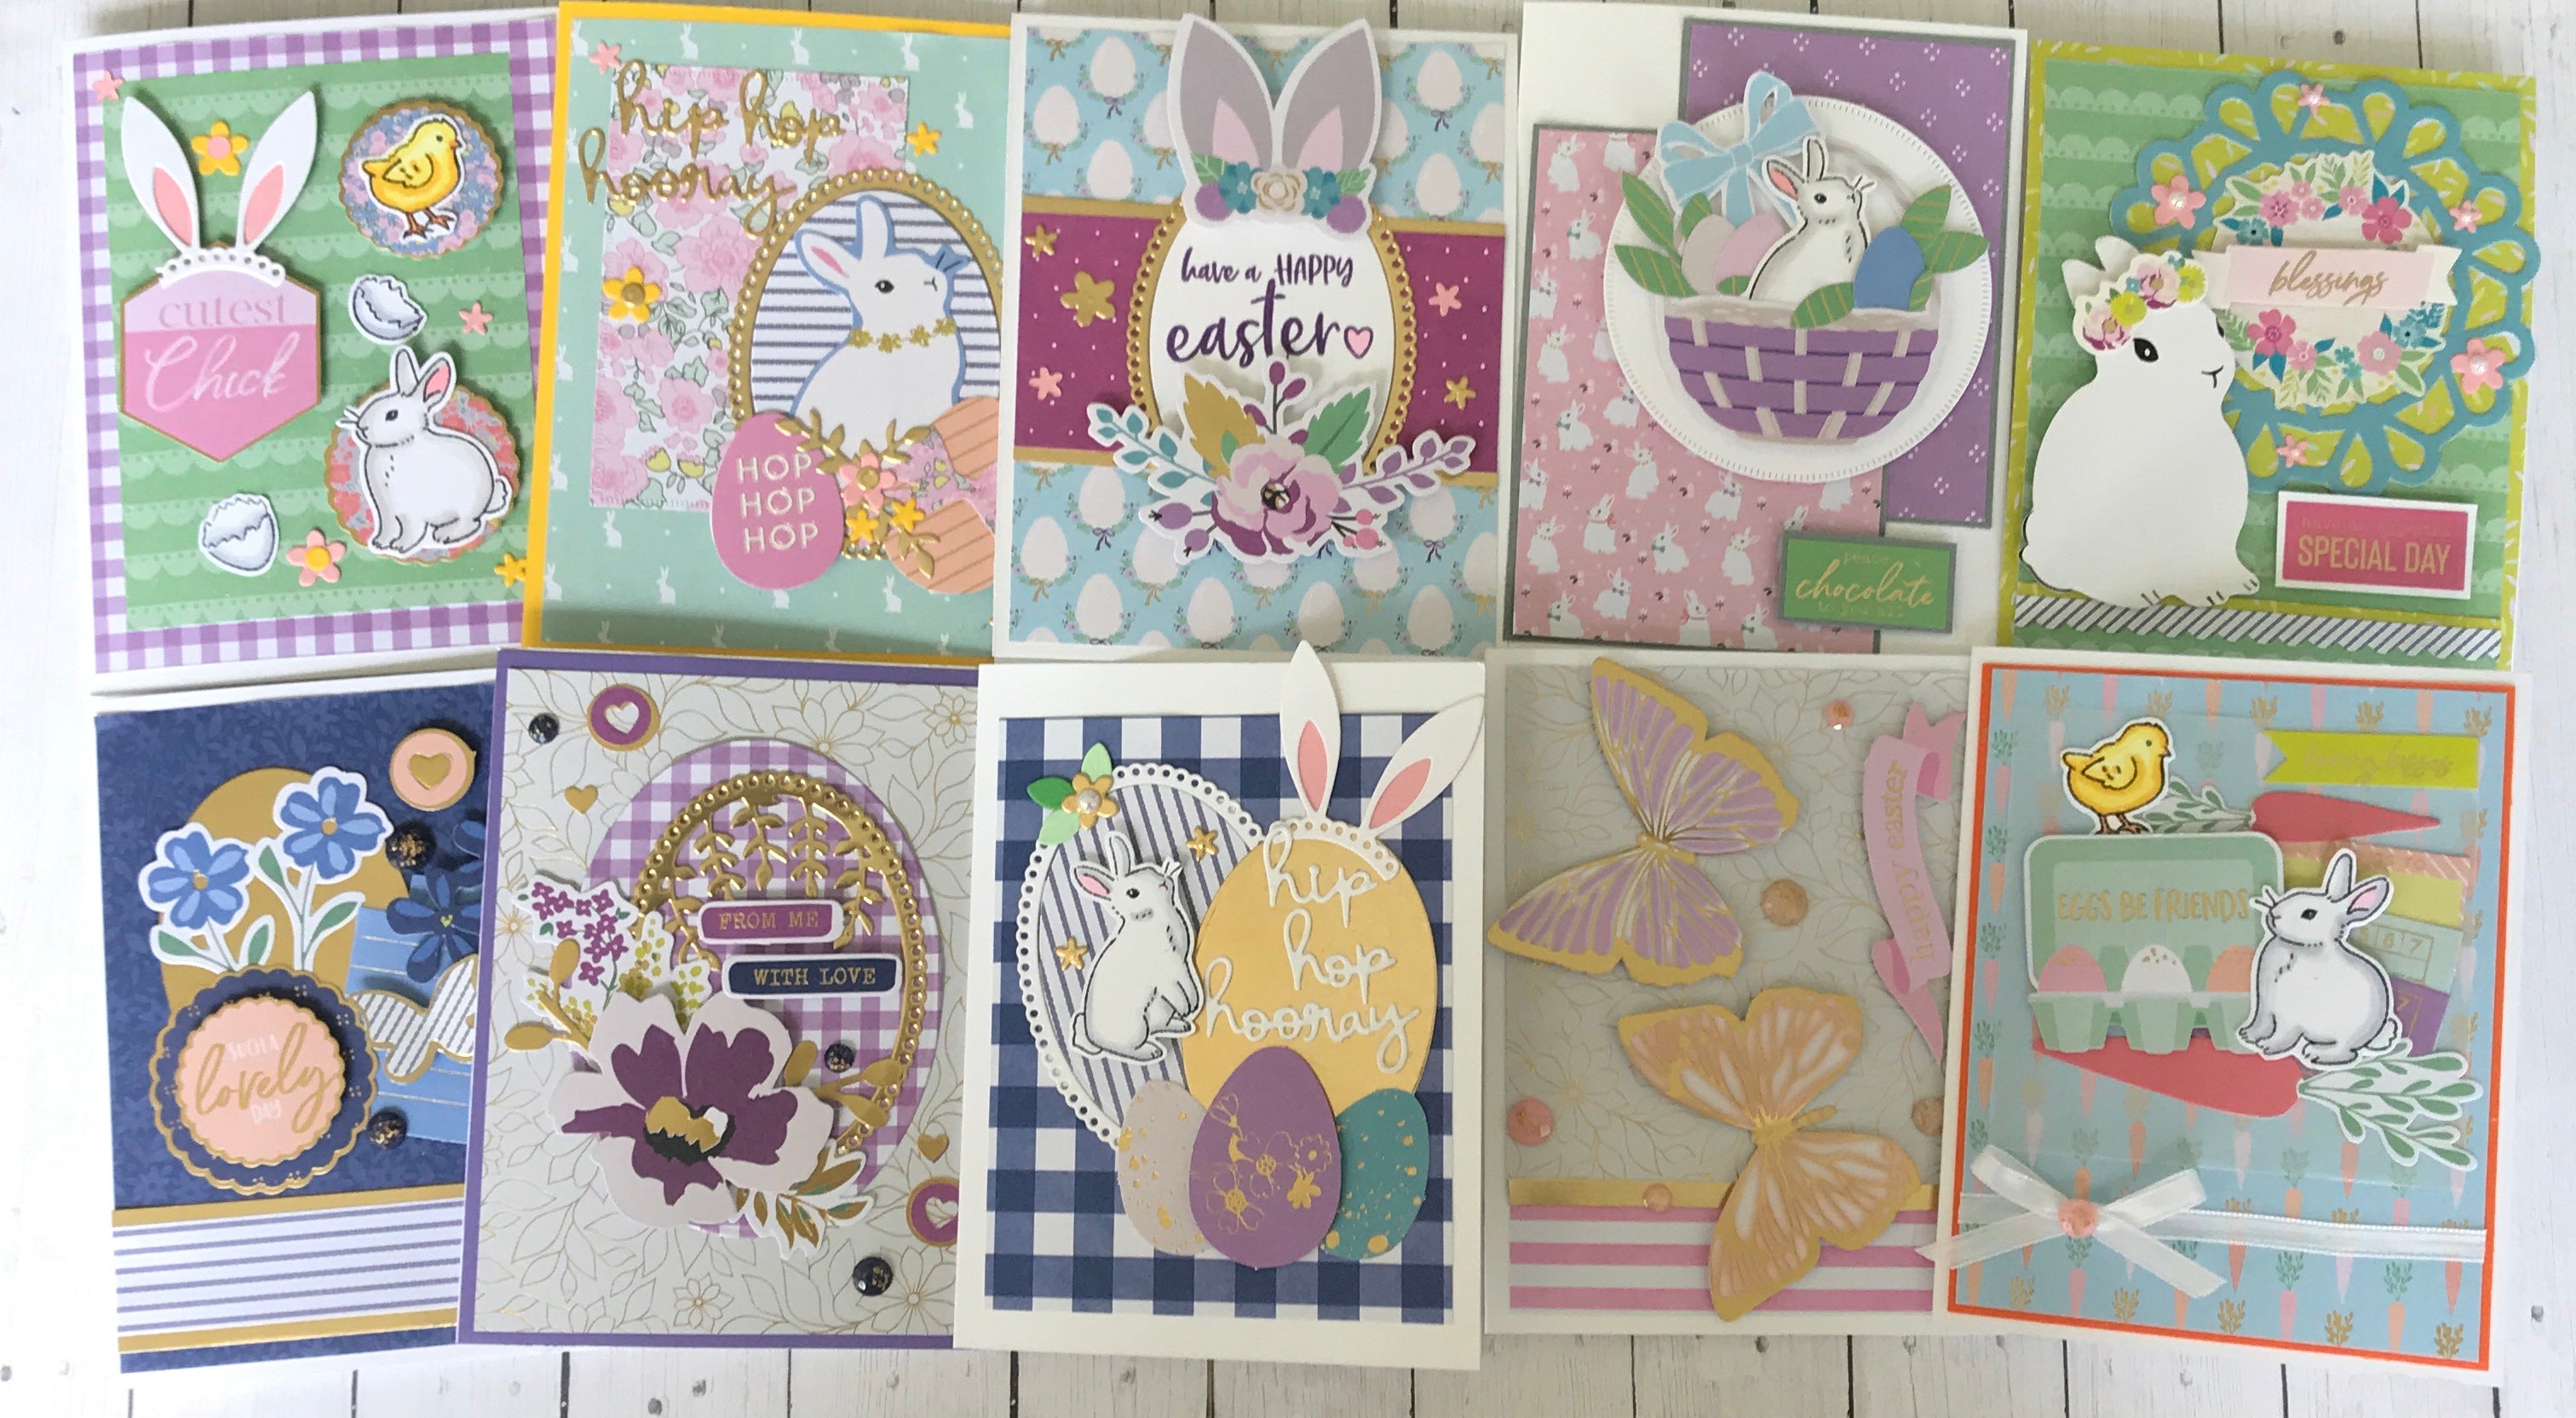
Card One


You'll notice that the cards I created from this particular Spellbinders card kit look a bit different than cards I made in past kits. For one thing, these ones feature a lot more pattern papers. To be exact, I was left with only 9 full sized sheets of pattern paper by the time I was done making 20 cards. That's mainly because I used more than two pattern papers per card. As you can see in card one. Additionally, I was also more drawn to the stamps and dies from this kit, so many of my cards feature those products as opposed to the ephemera pieces, which are more prevalent in past kit cards. For card one, I started by adding a strip of pattern paper across the center of my card panel. To add some gold to the card, I decided to add some skinny strips of gold card-stock to the top and bottom of the pattern paper strip. I glued a gold lacy oval border and white oval to the center of the panel. These oval dies came in the kit! I stamped the sentiment "Have a happy Easter" to the center of the oval with some purple ink. I added some ephemera pieces with foam dots above and below the oval. Finally, the card was embellished with some gold and pink flowers that came in the die cut pack.
Card Two


Believe it or not, but I managed to use up all four of the 3d stickers with these two cards I created. I started this card by first matting the doily ephemera piece onto some lime green pattern paper. This helped the doily to stand out against the busy patter paper. In the center of the doily, I added the "blessings" wreath. Beside the doily, I decided to pop up the 3d bunny sticker. I was able to pop up the bunny by first sticking it onto some scrap white paper, trimming around it and then adding foam dots behind the bunny. I did the same thing with the sentiment sticker next to the bunny. To add some more pattern, I decided to add a border sticker to the bottom of the card panel. I also added a skinny strip of that green pattern paper above the border sticker to coordinate with the doily. To matte the panel, I adhered it onto that same green pattern paper, again, to help everything look coherent.
Card Three 


I thought it would be fun to turn those oval dies into jumbo sized Easter eggs. I decorated the "egg" in the back with pattern paper and a stamped and colored bunny. I accented the egg with a white lacy oval frame and a flower with leaves. I also added some smaller flowers onto the egg. For the egg in front, I added the sentiment "Hip Hop Hooray". This sentiment also came in the die set. I also decided to add some bunny ears to the top of the egg. In front of the two large eggs are some smaller ones. These are super pretty because they each have gold foiling on them. I decided to pop up the center egg for dimension. I love how one of the cards is more masculine and the other looks more feminine just by changing up some of the pattern papers!
Card Four


You guessed it, this card features more bunnies! For this one I followed a card sketch as inspiration. As you can see, I didn't follow the sketch exactly. I made my rectangle panels slightly larger in order to see more pattern paper. I also moved my circle die cut in a different location on the card. To differentiate the pattern papers I decided to matte them with grey card stock cut an eighth of an inch wider than my pattern paper panels. The pink bunny panel was cut to (2.75 x 4 in) The smaller purple rectangle was cut to (2.5 x 3.75 in). To create my Easter basket, I glued some eggs, leaves and a stamped bunny inside of it. On the handle of the basket, I added a blue bow. I popped the basket up onto a white circle die cut with foam tape. I also added foam tape behind the circle and attached it to my card base. As for the sentiment, I decided to use a sticker from one of the sticker sheets in the kit. I attached it onto the grey card-stock I used for the mattes and cut around it with my scissors. That way, I could also pop up the sentiment with foam tape. Personally, I like to treat my stickers more like die cut pieces rather than just sticking them onto my card.
Card Five


The March 2020 Spellbinders kit wasn't just great for making Easter cards, but also general Spring themed cards. For instance, card five showcases some of the beautiful patten papers and floral ephemera pieces. I started this card by first die cutting a large oval from some of the plaid pattern paper. (This oval is from my stash) On top of that, I adhered a gold lacy oval border. I didn't bother to add the interior oval, but you can definitely do that if you prefer! On the top of the gold oval I decided to adhere the hanging leaves, which I die cut from the same gold card-stock from the kit. Below the leaves, I popped up the sentiment banners that say "from me" "with love" To dress up the ovals, I popped up one of the large floral ephemera pieces and tucked some floral branches and leaves underneath. I could have just stopped there, but of course I never know when to stop, so I decided to add some heart die cut pieces to the top left and bottom right of the card. I also decided to add a few navy blue gems to coordinate with the navy blue sentiment.
Card Six


I'm feeling quite blue for card six. If you've been following my Spellbinders blogs for a while now you'll know that I always create at least one collage type card. Like I said in the intro of my blog, I base my collages off of groups that I create before starting my 10 card designs. In the case of this card, I grouped my ephemera pieces and pattern papers based primarily on color, blue. However you can see on this card that I added some slight touches of coral amongst the blue. I felt that the color complimented the blue nicely. I made sure to try to add coral to the collage three times in order to create that pleasing "visual triangle". As far as laying out the collage, there's not a particular way I arrange everything. I mostly just play with the ephemera pieces until I find something that I like. The striped butterfly on the card was actually a sticker, which I stuck onto some scrap paper and cut around it. That way, I was able to pop up the butterflies wings. I loved the stripes on the butterfly so much that I decided to add a strip of striped pattern paper to the bottom of the panel, along with some skinny strips of gold on the top and bottom of it. Finally, I added a few navy blue gems to embellish the card.
Card Seven


Out of the 10 card designs, I would say card 7 was the fasted and most simple to create. All I did to create this card was attach a strip of striped pattern paper to the side of the card panel, which was also created with a gold foiled pattern paper. To break up the two patterns, I added a strip of gold card-stock in between. Then, I just attached two butterfly ephemera pieces. I glued their bodies flat to the card panel and popped up their wings with foam dots for dimension. The only other thing I did to this card was attach a few pink gems around the butterflies.
Card Eight


Card Eight is definitely my favorite in the bunch. I love the combination of pattern papers as well as that adorable bunny die cut. I glued the bunny onto a striped oval, which I popped up over a gold lacy oval border. Below the bunny I popped up an ephemera egg. I glued a pink bow to the egg, which matched perfectly with the pattern paper I added to the left of the bunny. The "hop hop hop" egg is one of the sticker eggs that I added to a scrap piece of paper, cut around and popped up with foam tape. Between the two eggs, I created a small flower cluster using some die cut leaves and flowers. To embellish the card, I adhered a few more of the same flowers around the card panel. On top of the floral pattern paper, I decided to adhere the sentiment "hip hop hooray", which I die cut from gold card-stock.
Card Nine


At this point, I still had some stamped and colored images on my desk, so I decided to put them into good use for card nine. I mounted a bunny and chick onto some scalloped circle ephemera pieces. I popped them up with foam tape, as well as the sentiment piece which says, "cutest chick". To dress up the sentiment, I added some cute bunny ears to the top. After adhering everything, I felt like the card was still missing something, so I decided to glue a cracked egg to the panel. I also scattered a few pink and yellow flowers around the card. I loved how I was able to use the flowers like sequins to embellish a lot of my cards!
Card Ten


I decided to end my 10 cards with a final collage inspired design. I grouped the three tickets from the ephemera pack together and adhered them flat onto a vellum square. The vellum was used just to mute down the busy background paper. Beside the tickets, I popped up the adorable carton of eggs die cut piece. Above the carton of eggs I added a carrot and a stamped and colored chick. I also added a sentiment sticker that says "bunny kisses". Next to the egg carton, I glued a stamped and colored bunny. Below the bunny, I glued down a larger carrot. I definitely wanted to incorporate some carrots on the card to match the carrot pattern paper in the background. Below the collage I decided to tie a white bow. The only embellishing I did for this card was add a pink gem to the center of the bow.
Video Tutorial
Supplies
Supplies NOTE: I am using affiliate links for the products listed below. If you decide to use these links, know that I will receive a small commission off of your purchase. This is no added cost to you as the consumer, it's just a way for us crafty friends to support one another!
Items sold separately
- Spellbinders “Feeling Hoppy” paper pad
- Spellbinders “Feeling Hoppy” Die cut Shapes
- Spellbinders “Feeling Hoppy” gold fleck gemstones
Card One
Versafine “Imperial Purple” ink
Card Two
Card Four
Card Five
Card Eight
Challenges
- This blog post is a submission for the Simon Says Stamp Wednesday Challenge "whatever the weather"
1 Comments
I still and always believe that Spellcasting is real. And its 100% real. Despite what people say. Jai Mata Sunlight remains the number one authentic gurumai in the globe. And she encourage you to stay healthy, live good and a happy life spiritually and physically. After casting her good-luck spell, A day after that day of the spell, I met my gf on my way to the mall. From there we hang out talk for a long time talking, laughing. Looking at her face with the way she smile was enough prove that she wants me back.we started hooking up again., and now, we back together. That’s not all. I’ve also been doing affiliate marketing online and it was really not paying me but taking alots from me. On this faithful day, a friend of mine called to tell me there is a great investments online and the company needs referrals. I took the job and mail Jai Mata Sunlight for her blessings cos she’s always be there for me and she always prays for me. And things has just be working out smoothly like I just want it that way and not stop cause money is been made, and me lover makes me life more meaningful and beautiful to me. i am really more than happy because I don’t know how many people out there that tried to cast spells and at the end, ended up victim in the hands of false spellcasters left with nothing but bad experience. But I can assure you due to your experience, not to pls compromise because spellcasting is real..and it’s legit when you have a real guru to perform the spell for you. I recommend you to try Jai Mata Sunlight if however you have interest but if you do not believe it’s real, pls don’t go and try yourself. Spells can make you rich within a twinkle of an eye. Restores back all your lost in the past. And lots more.. if you been looking for a spell to casting and you’ve been cheated or disappointed by people but deep down, something tells you that spell is real,.. copy and past ( JaiMataSunlight ) in your browser address to get her contact. Or via sunlightmata@gmail.com with your situation I know she will reply back and give you solutions that you need. You’d be lucky enough to find it and when you find it, believe is real.