0 Comments
Spinning Slimline Father's Day Pop up Cards
Video Tutorial
Card One
My first card features an open backed snow globe. This allows your centerpiece to fully spin around.
Two of my cards today are Father's Day cards, I used a sentiment from my stash to stamp "Happy Father's Day" on the sentiment strip that's included in the "Slimline Pop up Snow Globe" die set. I added the sentiment to the front flap of the bottom accordion and popped it onto the bottom base with foam squares.
Each of my centerpieces were made with our new "Layered Parrot" die set. The parrot is the perfect size to be a "spinner" in your slimline snow globes! I paper pieced him three different ways to create the blue macaw, the rainbow parrot and the military macaw. I love that you can create so many looks from a single die!
I made sure to paper piece the fronts and backs of each of my birds, so you can see the bird fully as it spins and swings. To paper piece the back side of each bird, be sure to glue your die cuts backwards. This will give you the mirror image.
Another reason I made three cards (apart from wanting to paper piece the three different parrots) is because I wanted to use each of the new stencils from our latest "Tropical Bliss" collection. This card features the "Zigzag" 6x6 stencil. I used "Lucky Clover", "Mermaid Lagoon", "Broken China", and "Tumbled Glass" Distress Oxide Inks to blend through the stencil.
Lastly, I decorated the fronts of all my cards using some tropical leaves and the hibiscus freebie die from our new "Tropical Bliss" collection. You will receive this die FREE with any purchase of $150+. With orders over $75+ you will receive one of the three stencils showcased today!
Card Two
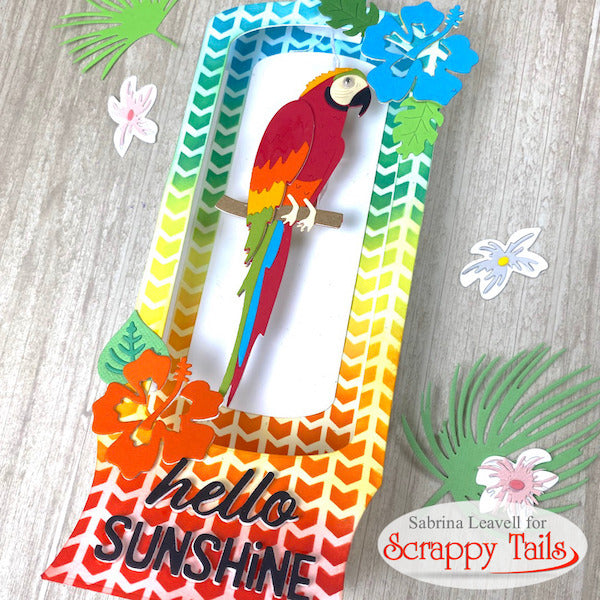
Rainbow lovers are going to enjoy card two! This one I made into a "closed" snow globe. This allows your centerpiece to swing back and forth while also showcasing more of the background.
I used our new "Chevron" 6x6 stencil to ink blend "Candied Apple", "Carved Pumpkin", "Squeezed Lemonade" "Lucky Clover" and "Broken China" Distress Oxide inks. Out of the three stencils, this one is the busiest, so I toned it back by blending back over each color with whatever ink was left over on my blender brushes. I also added a white die cut to the back of the card.
I decorated the front of the snow globe the same way as the first using our "Assorted Tropical Leaves" die set and the "Hibiscus' freebie. However, this time, I cut the sentiment flap on the bottom accordion off, and opted to show more of the beautiful ink blending.
I glued the "Hello SUNSHINE" sentiment that comes with the "Hibiscus" freebie onto the bottom of the card. I stacked it up with three white die cut layers and one black to help it stand out against the busy background.
Card Three
Card three features my favorite stencil from the new release, the "Aztec" 6x6 stencil. Through it, I blended "Lucky Clover", "Twisted Citron", Mustard Seed" and "Squeezed Lemonade".
In case you were wondering, each parrot took about 25 minutes to paper piece. (includes the backside)
If you're not into ink blending, I would suggest using patterns from our new "Tropical Bliss" 12x12 paper pad to decorate your card bases!
That concludes my cards today! I had a blast creating these unique slimline pop up cards. I love that they all coordinate, and made for a great card set. Our new "Layered Cockatoo" and "Layered Flamingos" would also make great spinners! There's so many possibilities, and you know me, I love mixing our older pop up die sets with new release items.
Thank you for stopping by, and I'll see you next time!
-Sabrina


