

0 Comments
Use your Ornament dies to Create Shaker Cards
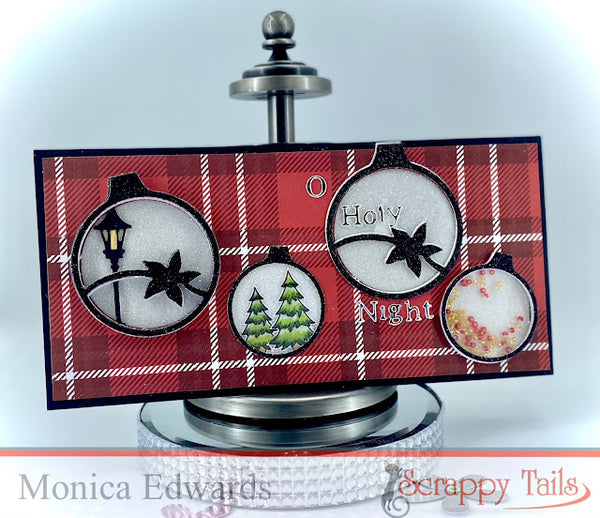
Hi everyone, I am here sharing another card for Scrappy Tails Crafts. I used some new stamps and dies from the latest Countdown to Christmas release including the Nativity Ornament, Festive Garden Cover Plate, and the Christmas Market 6x6 stamp set.
SLIMLINE CARD FRONT
1. Cut a piece of black cardstock to 8.25 x 4.25 and then cut your patterned paper to 8x4. I used plaid pattern paper to create a traditional look.
2. Take your ornaments and die cut them from the patterned paper only. die cut or hand cut some white glitter paper to go behind the ornaments. I decided to cut a white glitter panel to 7x75 x 3.75". I glued this panel between my black card stock panel and my pattern paper panel.
3. Next, die cut each ornament 7 times, and glue each layer together to give you the height to form your shaker walls. You can adjust the height of each ornament on the card by either adding or taking away layers. The final top layer of each ornament is cut using black glitter card stock. Behind the black layer, add a piece of acetate to form the shaker window.
3. Next, die cut each ornament 7 times, and glue each layer together to give you the height to form your shaker walls. You can adjust the height of each ornament on the card by either adding or taking away layers. The final top layer of each ornament is cut using black glitter card stock. Behind the black layer, add a piece of acetate to form the shaker window.
4. Stamp, color and die cut the Christmas trees and the lamp post from the Scrappy Tails Christmas Market stamp set using copic makers.
5. The final ornament on the right hand edge of the card I added some red/gold seed beads to create a shaker. You can create shakers for all of your ornaments if you want!
6. The sentiment on my card was die cut in silver mirror card stock from the Nativity Ornament die set.
Follow Monica on Social Media!