
1 Comments
Custom Light Up Haunted House Pop up Invitations
Video Tutorial Part One (Mass Production Process)
In part one, I share my process of mass producing intricate card designs. This a great video for those that are looking for useful tips on how to mass produce card designs quickly and efficiently while also staying organized. It is also meant to inspire you to start mass producing your Fall, Halloween and/or Christmas cards!
Video Tutorial Part Two (Card Assembly)
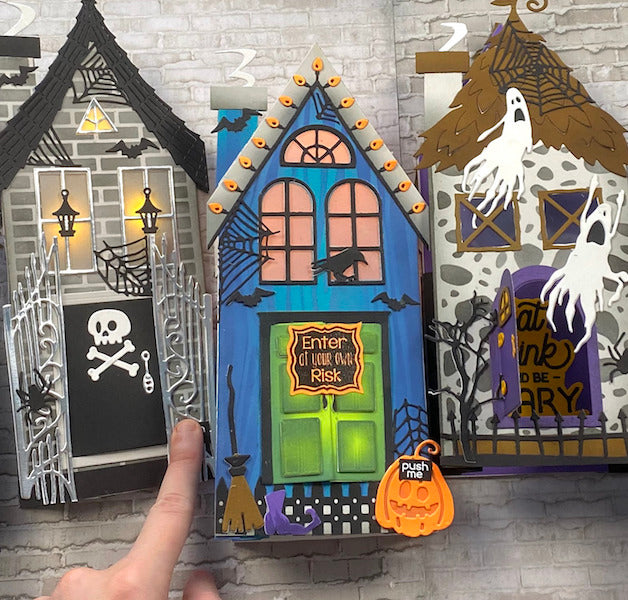
In part two, see how I transformed the "card kits" I created in part one, into 12 fantastic Halloween party invitations! In the video, I share three haunted house slimline pop up cards that each light up with Pear Blossom Press EZ Lights!
Supplies
For all 12 cards, I used a combination of Scrappy Tails Crafts and Tim Holtz Halloween dies. I used the Scrappy Tails Crafts "slimline Pop up Bird House" die set to create all of my card bases. Be sure to check out the second video above to see how to assemble each of these pop ups. There's also several other pop up tutorials on the Scrappy Tails Youtube channel.
Tim Holtz Halloween dies I used for all three card designs:
"Frightful Things" thinlet dies
Tim Holtz/Sizzix "Gate Keeper" thinlet dies
Tim Holtz/Sizzix "Regions Beyond" thinlet dies: (OUT OF STOCK)
Tim Holtz/Sizzix "Ghoulish" thinlet dies: (OUT OF STOCK)
Card One

These invites were most certainly a labor of love, but they were so worth it, and fun to create. They will fold flat and fit inside a #10 sized business slimline envelope. These cards are roughly 4x9". Obviously, you don't have to mass produce pop up cards, but you guys know, that's my jam!
Several details can definitely be excluded if you want to replicate these yourself. I did lots of die cutting, paper piecing and ink blending for my cards today. I enjoy all the little details, so I went for it, but just know, you can simplify these designs!

I added dimension to my blue houses by ink blending "Chipped Sapphire" Distress oxide ink to the edges of each house panel (front and back). I created my own stencil using the Scrappy Tails Crafts "Slimline Woodgrain Background" die. I cut it from heavy weight white card stock, and blended the same Chipped Sapphire ink through the stencil to create a loose, aged woodgrain texture for my houses.
For added dimension, I ink blended "Lucky Clover" Distress Oxide ink to the edges of my doors and to each of the door details. I ink blended "Black Soot" to the bottom part of each of my roofs, chimney details and door steps. I ink blended "Carved Pumpkin" to the bottom of each of my Jack-o-lanterns. Finally, my witch boots have a bit of dimension that I created with a dark purple Copic Marker.

I love these cards because you can see what's inside each one. For three cards, I added some Pear Blossom Press EZ Lights to light up my house windows. It's such a spooky and magical effect! For the other nine cards, I added an "Eat, Drink and be Scary" sentiment behind each door of my houses for a hidden surprise!
The front of this house was decorated using the Scrappy Tails' "Neighborhood House Add-on" die set (windows, door, roof, chimney and door step). I also used the coordinating shadow dies from the set to cut the windows and door openings through my front panel.
My roofs were decorated with some Halloween lights that I paper pieced using dies from the Scrappy Tails "Christmas Roof Bundle" die set. Yes, this is a Christmas set, but I just made the light bulbs orange to make them more festive for Halloween!
The black fence was die cut from the Scrappy Tails "Slimline Everyday Borders" die set.

Ok people, please don't show up to my Halloween party LOL! As much as I would love to party with my crafty friends, I won't have enough food, or drinks to entertain more than 12-15 people!
The back of my cards are all very similar with the same cute text/party info on each one. I blended "Stormy Sky" Distress Oxide Ink to the edges of all of my text to help it blend into my background and make it less stark white.
For this design, I added another roof with a string of lights, a pumpkin, a witch boot, a door step and a fence. You can definitely keep your backs more simple than this. I basically used whatever left over die cuts I had to decorate the back of all of my cards.
Card Two

My Halloween party is doubling as my husband's 24th Birthday party! This one happens to be his favorite design. I love the black, white, grey and silver color scheme.
Pro Tip: When mass producing a pop up card design, often times I draw a sketch of what I want my card to look like. This helps me compartmentalize the stamps and dies I want to use, the colors I want to use for each design, the techniques I want to use, and the color allocation of each design. I don't typically draw card sketches for single card designs, but for these, I found it helpful to keep myself focused and organized.

I added dimension to my grey houses by ink blending "Black Soot" Distress oxide ink to the edges of each house panel (front and back). I created my own stencil using the Scrappy Tails Crafts "Slimline Brick Background" die. I cut it from heavy weight white card stock, and blended the same Black Soot ink through the stencil to create a dirty, and aged brick texture for my houses.

I love how the windows light up on this design because it looks like the lanterns on my windows are lit. To see how I added the EZ lights inside my houses, be sure to check out my second video above.
The front of this house was decorated using the Scrappy Tails' "German Christmas House Add-on" die set (windows, doors, roofs, and lanterns). I also used the coordinating shadow dies from the set to cut the window and door openings through my front panel.
The chimney's and door steps were die cut from the Scrappy Tails "Neighborhood House Add-on" die set.

Here's a look at a regular Halloween invite I made with the same design. I love when you open the door it reveals a white heat embossed sentiment!

The back of this card was decorated with a white door step, a black roof, spiders and bats.
Card Three

I saved the best design for last. I absolutely love how this one turned out, especially the cobblestone background! This particular card was inspired by a fellow Scrappy Tails customer and follower, Estelle! Her Instagram handle is @atouscrap I encourage you all to see her original post that inspired me to create this card!

I added dimension to my grey houses by ink blending "Black Soot" Distress oxide ink to the edges of each house panel (front and back). I created my own stencil using the Scrappy Tails Crafts "Slimline Cobblestone Background" die. I cut it from heavy weight white card stock, and blended the same Black Soot ink through the stencil to create an aged cobblestone texture for my houses.

You might have noticed that I added vellum behind all of my light up windows for each card design. I love to use vellum, to me, it creates a beautiful glow as opposed to a harsh concentrated light.
The front of this house was decorated using the Scrappy Tails' "Fairy House Add-on" die set (windows, doors, and roofs). I also used the coordinating shadow dies from the set to cut the window and door openings through my front card panel.
The chimney's and door steps were die cut from the Scrappy Tails "Neighborhood House Add-on" die set.
The fence was die cut from the Lawn Fawn "Spooky Fence" die.

These ghosts are so spooky! I love that they're flying out of the door and the top left window. These Tim Holtz Halloween dies are my all time favorites! I have used these dies for several custom Halloween party invitations last year, they're absolutely "fangtastic"!
On all of my non-light up invitations I added acetate behind the windows to make them look like glass windows.

I blended "Black Soot" Distress Oxide Ink to the edges of all of my text to help it blend into my background and make it less stark white. Vintage Photo would also be a great option!
For this design, I added another roof some spiders, a black cat, a door step and a fence.
Thank you so much for stopping by, I hope you're all inspired to create your own pop up invitations! Please let me know if you're interested in seeing me transform these houses into Festive Christmas houses for a Christmas Party!
-Sabrina
1 Comments
I love all of these!!! My cart is bursting!!!!